• Zenbe
• Orgoo
• Fuser
• TopicR
• Goowy
• Jubii
Tuesday, August 26, 2008
Monday, August 25, 2008
Lab topology for your ccna, ccnp, ccie or just playing around
1. CCNP + CCNA Lab Topology for Chris Bryant Classes
Picture :

File : ccna_ccnp-sim.zip
2. CCNP+CCNA Lab Topology for Chris Bryant Classes (With Conf)
File : ccna_ccnp.zip
3. Using Dynamips for CCIE Lab Preparation
Video : Click Here
File : internetworkexperttopologies.zip
4. IPExpert Lab Topology V. 8.0 Full - Diagram A Standard Topology
IPExpert Lab Topology V. 8.0 Full - Diagram A Standard Topology and Initial Router configurations. The attached .zip contains the NET file, and the initial configurations for diagram A for IPExperts Diagram A. Diagram B addresses are used. This is the base configuration for all LAB’s from WB 8.0. I used two 3640’s with NM-16ESW modules to replace the 3550’s.
FIle : net-file-and-base-router-configurations-ipexpert-80.zip
Picture : ccnp_lab-diagram.zip
File : ccnp_109.zip
Picture :

File : iscw_1_1.zip
7. CCNP BSCI lab
Picture :config_exercise_diagram.zip
File : bsci-v2-labfile.zip
9. Expert-Labs, CCIE Routing and Switching, ISDN
10. Network Force
- Physical cabling scheme & device specifications of CCIE Rack-1
- Sample lab design Topology A (physical cabling always remains the same)
- Sample lab design Topology B (physical cabling always remains the same)
- Sample lab design Topology C (physical cabling always remains the same)
- Sample lab design Topology D (physical cabling always remains the same)

Other Links :
11. Access Server

File : Lab 1
13. CCNP/CCNA lab topology / sypt
Picture : ZIP
14. IEWB V3 VOL1 LAB1, R1 - R6 AND BB1 - BB3 NVRAM’s and .net file complete. Just add IOS and boot up. Uses 2 instances of Dynamips.
File : zip
15. MPLS VPNs with duplicate customer addressing
Here’s a topology file I’ve created with a 4-node MPLS network. Two MPLS VPNs are configured with identical LAN and WAN addressing. The 4 PE routers exchange routes using MP-BGP and use OSPF for the full mesh of MPLS connections. Each CE router has two connections to the network. I’ve included a PDF file that lays out the topology, IGP and VPN routing. ( Justin White CCIE #14745)
File :mplsv1.zip
16. IPExpert Section12 MultiProtA-DiagramA
What you’ll need:
-
- 1 x PC that can run Dynamips and VMWare. Min 1GB RAM, Pentium Celeron
- 1 x Pix 515 UR
- 1 x 3550 Switch
- 2 x ASA 5510
- 1 x VPN Concentrator 3005
- 1 x IPS 4215 (or FrankenIDS)
17. DMVPN config with EIGRP on 12.2T15
It consists of a Hub and a Spoke router emulated on the Dynamips emulator
18. MPLS VPNs v1.5 with MPLS-TE instead of LDP
Here’s the version 1.5 of my MPLS lab updated to use MPLS-TE instead of LDP for distribution of labels. There aren’t any other changes over version 1, so the diagrams should be identical. Remember that this version consists of a 4-node MPLS network. Two MPLS VPNs are configured with identical LAN and WAN addressing. The 4 PE routers exchange routes using MP-BGP and use OSPF for the full mesh of MPLS connections. Each CE router has two connections to the network ( Justin White CCIE #14745 )
File : mplsv15.zip
19. MPLS VPNs v2.5 with MPLS-TE instead of LDP
Here’s the version 2.5 of my MPLS lab updated to use MPLS-TE instead of LDP for distribution of labels. There aren’t any other changes over version 2, so the diagrams should be identical. Remember that this version consists of a 6-node MPLS network with a pair of P-core routers that also act as route-reflectors for the PE routers. ( Justin White CCIE #14745 )
File : mplsv25.zip
20. 3 topologies in one lab (simple1,Frame-Relay,Ethernet-Switch)
File : topology.zip
21. MPLS ( based on Cisco very nice article you can see for your self in no more then 10 minutes a 6 router lab schema working with MPLS )
File : mpls.zip
22. ccie practice lab dynamips
.net topology that is smaller but very useful for IP Services practice like Proxy Arp, NAT, HSRP and all the things you want to test that do not require a full lab of 13 routers.
the lab was prepared from the IEWBv4 IPServices book under Advanced Technologies also to people that do not have this Work Book it can be very handy as it is not very hard to figure the structure of the lab.
File : newie
23. CCNP BSCI Student LAB from Curiculum
This is the first lab in the section EIGRP. (module 2 lab 1)
Attached is a picture of the layout, the gns file for those who use GNS-3 and of corse the net file.
You only have to change the path to your IOS image.
File : ccnp-bcsi.zip
24. GRE over IPSEC with EIGRP lab
This is a working lab built straight from the configuration guide from Cisco.com
http://www.cisco.com/en/US/tech/tk583/tk372/technologies_configuration_example09186a008009438e.shtml
File : gre-over-ipsec-with-eigrp-lab.zip
25. Cnap Bsci 642-901 Version 5.0 Dynamips Eigrp Lab Topology
Lab 2-1 EIGRP Configuration, Bandwidth, and Adjacencies
Lab 2-2 EIGRP Load Balancing
Lab 2-3 Summarization and Default Network Advertisement
Lab 2-4 EIGRP Frame Relay Hub and Spoke
Lab 2-5 EIGRP Authentication and Timers
File : cnap-labpackage.zip
26. Sample topology for Inter-AS MPLS VPNs
After reading a section from “MPLS and VPN Architectures, Vol 2″, I looked closer at a feature that allows VPNv4 routes to be exchanged between two MPLS networks without requiring LDP or MPLS-TE, just BGP. Here’s the Cisco document:
MPLS VPN—Interautonomous System Support
Only the sample in the Cisco docs doesn’t document every step involved, so I’ve used their topology and filled in my own blanks. The attached ZIP file has a PDF showing the topology. Table 3 shows the specific platforms and minimum versions of IOS that support this feature.
Personally, this might be one of the coolest features that might appear on the CCIE SP lab. This was really fun to put together and I hope it helps someone one else too.
–
Justin White
CCIE #14745
File : interas-asbr.zip
27. IPV6 RIPng
28. BGP/Default Route Lab (Brian)
Here’s a topology that mimics a network I just completed building. It consists of one location (AS65000) multihomed to 2 ISP’s (AS300,400), with a remote site (R2) connected to ISP B (AS400). Both sites, (R1,R2) are connected with a T1.
What I’m doing with this lab is sending a default route to R2 via BGP, full tables to R65000, and redistributing the default path to OSPF.
Since I’m using IOS firewall images, you could also have IPSec/GRE tunnels setup and run OSPF between R1 and R2.
Here is an IPv6 EIGRP Topology over Frame-Relay with an OSPFv3 route redistributed in to EIGRP.
Frame-Relay Cloud
R1 - IP Address ABCD::AC0C:7B01/96 (s1/0)
R2 - IP Address ABCD::AC0C:7B02/96 (s1/0)
R3 - IP Address ABCD::AC0C:7B03/96 (s1/0)Fast Ethernet
R2 - IP Address BCDE::AC0C:1702/96 (fa1/0)
R3 - IP Address BCDE::AC0C:1703/96 (fa1/0)
R4 - IP Address BCDE::AC0C:1704/96 (fa1/0)Point-to-Point Serial
R3 - IP Address CDEF::A02:203/96 (s1/1)
R4 - IP Address CDEF::A02:204/96 (s1/1)Loopbacks
R1 - IP Address 1111:1111::/16 (Lo0)
R2 - IP Address 2222:2222::/16 (Lo0)
R3 - IP Address 3333:3333::/16 (Lo0)
R4 - IP Address 4444:4444::/16 (Lo0)
R4 - IP Address 4545:4545::/16 (Lo1)To use a Full Mesh Frame-Relay you have to map the link-local and interface addresses to the dlci. Only the link-local will have to be broadcast. Link-local addresses may vary from mine.
The command is frame-relay map ipv6Do a show ipv6 interface f0/0 to get the Link-Local address for each router connected to the frame-relay cloud.
To enable IPv6 routing type ipv6 unicast-routing followed by ipv6 cef globally
Then type ipv6 router eigrp
followed by no shutdown. TIP
The EIGRP process by default, is in a shutdown status. Just like an interface. You will have to type no shutdown in the EIGRP process. This is a common error for those new to IPv6 EIGRP.
EIGRP also has to be enabled at the interface level by typing ipv6 enable followed by ipv6 eigrp
Put R4’s Loopback 1 into OSPFv3 area 0, then redistribute it into IPv6 EIGRP.
Ping all Address.
If you want to duplicate this topology you need at least IOS Version 12.4(6)T. Thats when Cisco introduced EIGRP for IPv6.
File : file
30. IPv6 running OSPFv3 & RIPng
Here is an IPv6 Routing Lab - Using 4-3640 Routers
It is running OSPFv3 and RIPng. Redistribution will be set up on R3. This will be a pure IPv6 environment. (as pure as I can get it)
I recommend IOS 12.3 or better
R1 & R2 are connected via Serial links using these ipv6 addresses
R1 — 0:1111:2222:3333::1/48 (s0/0)
R2 — 0:1111:2222:3333::2/48 (s0/0)
R2 & R3 are connected via Serial links using these ipv6 addresses
R2 — 0:2323:2222:3333::2/48 (s0/1)
R3 — 0:2323:2222:3333::3/48 (s0/0)
R3 & R4 are connected via Ethernet links using these ipv6 addresses
R3 — 0:3434:3333:4444::4/48 (e1/0)
R4 — 0:3434:3333:4444::3/48 (e1/0)
The Loopbacks for each router
R1 — 0:1111:1111:1111::1/48
R2 — 0:2222:2222:2222::2/48
R3 — 0:3333:3333:3333::3/48
R4 — 0:4444:4444:4444::4/48
The first thing you should do is enable ipv6 unicast-routing and ipv6 cef globally.
Then enter the IPv6 addresses.
Note: some IOS require you to type ipv6 enable at the interface level.
Router 1
Enable a router-id of 1.1.1.1 for the OSPFv3 process
The Loopback and the Serial interface should be in area 0
Turn off ipv4 routing
Router 2
Enable a router-id of 2.2.2.2 for the OSPFv3 process
The Loopback and both Serial interfaces should be in OSPFv3 area 0
Turn off ipv4 routing
Router 3
Enable a router-id of 3.3.3.3 for the OSPFv3 process
The Loopback interface should be in OSPFv3 area 3
The Serial interface should be in OSPFv3 area 0
The Ethernet interface should be in RIPng process
Turn off ipv4 routing
Router 4
The Loopback and Ethernet interface should be in the RIPng process
Turn off ipv4 routing
Redistribution on Router 3
1.) Redistribute RIPng routes into OSPFv3 with a metric of 120 and include connected routes.
2.) Redistribute OSPFv3 routes into RIPng with a metric of 3 and include connected routes.
Make sure you can ping all routes.
Some Basic IPv6 commands
ping 0:6754:4567:8899:33:84:4
show ipv6 route
show ipv6 rip
show ipv6 ospf
show ipv6 interface brief
—-
File : config
31. IEWB - Service Provider Topology - Visio Diagram v1.0
I have made this Visio diagram to have a better overview of the internetwork expert 4.0 service provider topology .
I have tried to match physical interfaces + Frame-relay Dlci + ATM Vci on the diagram itself so when you study you have everyting “insight”.
(Conan at hacki Forum)
FIle : sp-provider-topology.zip
32. 3725 - Configuring a Basic MPLS VPN
You can emulate with this a 05 router MPLS VPN backbone, capable of having different customers CPE’s and working even if they have the same IP addresses and transport BGP.
It worked fine at a 1G RAM IBM NetVista Desktop with one 1.8 GHz processor.
Just remember to have SP Services IOS for this 3725
FIle : mplsv2.zip
33. MPLS VPN Topology with 2 VPNS/4 CORE Router/4 CE/
Here is a Topology for MPLS VPNs with 2 different VPNs connected to the CORE, and there is a route reflector RR connected to both PEs:
pe1———-p1———–pe2
va-ce1 vb-ce1 va-ce2 vb-ce2
FIle : mpls-lab.zip
FIle : dynamips-dynagen_ipexpert_version_90_topology.zip
36. Vlan LAB

File : vlan-lab.zip
37. BGP Topology Lab
File : bgp.zip
38. CCNA Lab for Dynamips / Dynagen
39. TrunkMonster.013.net CCNA lab for 3640’s with switch module
Here is a lab I use for router and switch practice.
It has lots of redundancy.The IP addresses are just suggestions.
I did it this way so that RIP and IGRP can be used too.Designed for 3640 with a NM-16ESW switch module.
Needs IOS that understands switches.
I can not find the Cisco page with minimum IOS info, please forgive!
(sumthin like 122-8.T minimum)
File : Monster
40. Cisco Student Guide topology
I want to share the cisco mpls student guide 2.2 for practices.
This includes the topology and the *.net file.
Greetz and thanks for this great forum
Marigo
File : mplslab
41. CCNP Labs (video, etc) very complete .
42. CCNA Labs (video, etc) complete.
43. IPExpert Service Provider ( SP ) v.4.0 topologies.
Here is the topology for the IPexpert Service provider v4.0 workbooks
There is one .net for the A1 rack and another for the 7200 rack.
File : ipexpert
44. DMVN by sankilla.
File : dmvn
45. 3 Router lab for basic static, default routes, RIP and IGRP
46. BGP Lab, test eBGP, iBGP, route policing and route-maps.
File : bgp_lab
47. Dynamips topology incl net file for BCMSN.
For my BCMSN study I copied the topology from my workbook and made the *.net file for dynamips.
It does not cover all topics but you can test with STP, VTP, Etherchannel, etc.
I use the C3640-JK9O3S-M), Version 12.4(16a) IOS version.
File : bcmsn
48. MPLS Lab using multiple vrfs, ospf, ldp, MP-IBGP from theciscotech.
File : lab2
49. BGP Lab V01 by David Sudjiman

50. MPLS Lab version 3 by Justin White. Supports IPv6 VPN feature (6VPE) 2008-04-23
File : MPLS Ver 3
51. MPLS Lab version 3.5 by Justin White. Supports IPv6 VPN feature (6VPE) 2008-04-23
File : MPLS Ver 3.5
52. CBT CCIE practice lab by French Cisco User Group
53. Dynamips Dynagen GNS3 - OSPF virtual links by French Cisco User Group
54. Dynamips Dynagen GNS3 - Topologie IPv6 avec des 2691 by French Cisco User Group
55. Dynamips Dynagen MPLS VPN by French Cisco User Group
56. GNS3 ccna troubleshooting lab
Goal is to resolve connection between the end points
Password for everything is ‘trouble’
Used c2691-adventerprisek9_sna-mz.124-13b.bin for IOS
Default location for these files is C:\Program Files\GNS3\projects
File : trouble
57. Basic setup for NetMasterClass DOiT Workbook, from CCIE track.
58. CCNP lab (BGP/Default Route Lab)
File : ccnp3
59. Cisco student guide topology
File : MPLS-Lab
60. EIGRP lab example given in Jeff Doyle Vol 1
File : EIGRP
101 Resources for Self Learning Cisco
1. About Cisco From Wikipedia
2. Certification On Cisco From Wikipedia
- 1 Associate Certifications
- 2 Professional Certifications
- 3 Expert-level certifications: Cisco Certified Internetwork Expert
3. Start Learning On Certification Level
>>>> CCNA
CCNA 1, Intro to Networking, Networking Fundamentals, Networking Media, Cable Testing, Cabling LANs and WANs, Ethernet Fundamentals, Ethernet Technologies, Ethernet Switching, TCP/IP Protocol Suite and IP Addressing, Routing Fundamentals, TCP/IP Transport and Application Layers
CCNA 2, WANs and Routers, Intro to Routers, Configuring a Router, Learning about Other Devices, Managing Cisco IOS Software, Routing and Routing Protocols, Distance Vector Routing Protocols, TCP/IP Suite Error and Control Messages, Basic Router Troubleshooting, Intermediate TCP/IP, TCP/IP Transport and Application Layers
CCNA 3, Intro to Classless Routing, Intro to Single Area OSPF, Intro to EIGRP, Switching Concepts, Switches, Switch Configuration, Spanning-Tree Protocol, Virtual LANs, VLAN Trunking Protocol
CCNA 4, Scaling IP Addresses, WAN, PPP, ISDN,Frame Relay, Intro to Network Administration
>>>> CCNP
CCNP 1, Overvew of Scalable Networks, Advanced IP Management, Routing Overview, RIP v2,EIGRP, Single Area OSPF, Multi-Area OSPF,IS-IS,Route Optimization Part 1,,Route Optimization-Part 2, BGP-Part 1, BGP-Part 2,The Routing Table
CCNP 2, Wide-Area Networks,Modems and Asynch. Dialup Connections, PPP Overview, ISDN and DDR, Dialer Profiles, Frame Relay, Managing Frame Relay Traffic, WAN Backup, Queuing and Compression, Scaling IP Addresses with NAT, Using AAA Scale Access Control, Broadband Connections, Virtual Private Networks
CCNP 3, Spanning Tree Protocol, InterVLAN Routing, Redundancy, AVVID, QoS, Securing MLS Networks, VLAN Maps, Transparent LAN Services
4. Simulator
- Semsim
- Boson
- Cisco 7200 Simulator (Dynamips), Dynagen (Dynamips front-end)
- VNUML (VNUML is aimed to help in testing network applications and services over complex testbeds made of several nodes (even tenths) and networks inside one Linux machine, without involving the investment and management complexity needed to create them using real equipment)
- Gns-3, The gns-3 project main goal is to develop a graphical user interface (GUI) for the network simulator ns-3 and using an IOS emulator - Install Steps in Windows XP
- VirtualPod
- CertExams
- Routersim
- MIMIC Virtual Lab CCNA
- Networksims
5. Video Tutorial around Cisco, Dynamips and Dynagen
- Cisco - Dynamips simple hub configuration
- Cisco - Dynamips (Router Emulation Software) Installation Tutorial
- Cisco - Dynagen / Dynamips Basic T1 Configuration
- Cisco - Dynamips with Microsoft Loopback Interface
- Cisco - Dynamips Virtual Wan with Ethernet Connectivity
- Cisco - Dynamips and Dynagen install on Linux
- Dynamips - Router emulation lab with a 3640 IOS image
- Dynagen - Using putty for Console access
- Cisco - Session Logging with Hyperterminal
- Cisco - How to enable ssh on a router
- Cisco - Automatic configuration backup
- Cisco - Replace the configuration on a running router
- Cisco - Config diff command
- Cisco - AAA local authentication
- PEMU - Cisco Pix Emulator on Windows
- PEMU - Cisco Pix Emulator on Linux
- Cisco - Router Time, DST and NTP configuration
- Cisco AAA login authentication with Radius (MS IAS)
- Cisco IOS - Run exec commands from config mode with ‘do’
- IOS on PC
- How to load an IOS image
- Frame-Relay setup
- Cisco SDM Config
- Simple Frame Relay
- Frame Relay Tutorial
- Config cisco routers such as a VPN server
- Config Cisco Routers for Call Manager
- Dynamips and Linux ethernet interface
- Dynamips with Linux loopback (tap) interface
- How to configure nat overload (pat)
- Cisco-automatic configuration Backup
6. Video Training around Networking
- TCP/IP Fundamentals Training Videos (This series of videos on TCPIP Fundamentals, by Scott Skinger, is the perfect primer for an IT newbie or an excellent review of important TCPIP concepts for the seasoned IT pro. Topics covered include TCPIP theory, assigning static/dynamic IP addresses, components of an IP Address, configuring subnet masks, public/private IP addresses, IP address planning, calculating binary numbers, configuring the default gateway and more)
- Network Components (Network+ Training - Network Components, by Chris Bryant, teaches you all about the important devices that make up a computer network. Topics covered include repeaters, hubs, bridges, switches, network cards, firewalls and proxy servers. You will learn how a switch operates, the benefits of using a switch over a hub/bridge and much more)
- Cisco routing and switching (Cisco CCNA - Lan Switching,Troubleshooting - Physical & Data Link Layer,Troubleshooting - Frame Relay)
7. Cisco IOS
- Unzip/Uncompress Cisco IOS in Windows XP
- Simple way to find Cisco IOS
- Top ten Cisco IOS tips
- How to Upgrade IOS on a Cisco Router
- Understanding the IOS File Name Convention
- Hints and Tips Before Upgrading the IOS of a Cisco Router
- Show active IOS processes
- Type 7 decryption in Cisco IOS
8. Cisco Tips and Tricks
- Cisco Routers and Switches: Tools, Tips and Tricks You Never Knew
- The Coolest Cisco Links of All
- BGP quick tips
- How to Setup a VLAN on a Cisco Switch
- Configure Vlan on Vmware and Dynamips : step by step
- How to use the OSI Model to Troubleshoot Networks
9. Sample Config & Guide
- One router, NAT to 2 ISPs
- Cisco 1760-V SRST & POTS w/notes
- Cisco 2651XM-V SRST & PRI w/notes
- Cisco 5500 Catalyst Switch
- Cisco PIX 520 Firewall ver 6.3
- Sample Configuration for BGP with Two Different Service Providers (Multihoming)
- Sample Configuration Using the ip nat outside source list Command
- Guide to Cisco Router Configuration
- Sample Configuration for BGP with Two Different Service
- Cisco 801 ISDN calling an ISP with one way CHAP authentication and NAT
- Async Dial Back Example
- Back-to-Back Frame Relay
- Using the Border Gateway Protocol for Interdomain Routing
- CCIE Voice Home lab with Dynamips/VMware
- CallManager Express and Dynamips
10. Free Cisco Lab
11. Forum
- 7200emu.hacki.at
- Cisco Forum
- CiscoHQ
- CIscoSim
- VelocityReviews
- internetworkexpert
- routerie
- Sadikhov
- networking-forum
12. CCIE Blog ( journey to become CCIE day by day)
- Becoming A CCIE
- A Networker Blog
- I Should Have Gone With Cisco
- My CCIE Training Guide
- Cisco Learning Blog
- Mysecretofsuccess’s Weblog
- IT Leak
- Bitbucket Blog
- CCIE Candidate
- CCIE Pursuit
- Himawan Nugroho
13. GNS3 Related Tutorials
- GNS3 Graphical router emulation software
- How to use Putty for console access
- How to integrate a Microsoft Loopback interface with GNS3
- How to build an Internet Lab
- Installation Tutorial for Linux
- How to configure a GRE/IPSec VPN - Part 1
- How to configure a GRE/IPSec VPN - Part 2
14. Cheatsheet (by PacketLife) Download All Cheatsheet
- Procotocols : BGP ver 1.0, EIGRP 1.1, Ipsec, IPV4, IPV6, IS-IS, OSPF, SPanning Tree
- Reference : Common Ports, Subnetting
- Syntax : Markdown, MediaWiki
- Technologies : MPLS, QoS, Vlans
- Misc : Cisco IOS version, Physical Terminations
15. Others :
- Cisco Router NAT Tutorial, the Definitive Cisco Router NAT Tutorial! Want to start earning the Big Bucks as a Network Engineer? This tutorial is your launching pad into learning what it takes to configure and manage Cisco Routers.
- Cisco Router Keys 1 Bonus Combo, Cisco Router Keys 1 *and* Cisco Router NAT/PAT Tutorial *and* 5 Cisco Router Visio Network Diagrams
- Subnetting Keys Training Package.The definitive guide to learning how to Subnet IP networks. This is a skill that is VITAL for anyone working in Network
Engineer, Network Administration, IT Helpdesk, basically any IT job or career. In this ebook all of the crucial steps are
laid out in a very easy to understand way so that you can become a master at subnetting.
- Cisco Router Keys #1
The Definitive Cisco Router Basics Tutorial! Want to start earning the Big Bucks as a Network Engineer? This tutorial is your
launching pad into learning what it takes to configure and manage Cisco Routers.
- Cisco Router Keys 1, PIX/ASA Firewall Keys, Subnetting Keys, Tutorials, Configs, Diagrams - Bundle
Cisco Router Keys 1 *and* Cisco Router NAT/PAT Tutorial *and* 5 Cisco Router Visio Network Diagrams *and* PIX/ASA Firewall
Keys *and* PIX Firewall Sample Configuration Bundle *and* Subnetting Keys Ebook And Video Training Package
- Cisco Router NAT Tutorial
The Definitive Cisco Router NAT Tutorial! Want to start earning the Big Bucks as a Network Engineer? This tutorial is your
launching pad into learning what it takes to configure and manage Cisco Routers
- Cisco PIX/ASA Firewall Keys Bonus Combo
PIX/ASA Firewall Keys Bonus Combo including: PIX/ASA Firewall Keys *and* Cisco Router NAT/PAT Tutorial *and* 5 PIX Sample
Conguration Bundle
- Lab topology for your ccna,ccnp,ccie or just playing around (Collection of Lab Topology)
- Routerlabs for Cisco Simulator (collection of lab topology too)
- Lab 2, Modelling the CCNA Topology
- Ideal CCNA Lab Setup
- Best CCNP Lab? Part II
- Beginner Howto (using dynamips, formerly in wikipedia)
- Dynamips and dynagen on usb drive, windows
- Become CCIE with simulator
- How to install Dynamips/Dynagen in Ubuntu 7.04 (Feisty fawn)
- VNUML and Dynamips/Dynagen mixed scenario
- Linux Live CD of Dynamips/Dynagen (Virtualpod)
- VNUML Live DVD
- Routers, Switches & Firewalls – Learn how they are different
- Poor Man’s Guide to Building a CCIE Lab
- How to run a virtual pod
- Dynagen Tutorial, very useful to learn how dynamips and dynagen work
- Thebryantadvantage, daily free questions to help you earn your CCNA, CCNP, Network+, A+, and Security+ certifcations
- Using Dynamips for CCIE Lab Preparation on Mac OS X
- Compiling Dynamips on (Intel) Mac
- Router-How To List
- Current Hardware supported by Dynamips
- CCIE Voice Home lab with Dynamips/VMware
- Vyatta, the easy tutorial
- Quagga, the easy tutorial
- Basic MPLS VPN (pdf)
- Simple MPLS VPN tutorial (pdf)
- Five routers on your laptop
- RIP multicast updates are sent with TTL of 2
Hack Your Wii for Homebrew Apps and DVD Playback
Despite the fact that it ships with a DVD drive, for whatever godforsaken reason, the Nintendo Wii doesn't support DVD playback--until last week, that is, when a homebrew hacker released a tool that enables DVD playback on your Wii. The best part? You don't have to crack open your Wii or disturb your hardware in any way to install it. Let's take a detailed look at how to softmod your Wii with the Twilight hack to run homebrew apps. Then I'll show you how to install the Wii port of the open source media player, mplayer, to turn your Wii into a DVD (or should I say WiiVD?) player.
What You'll Need
Since we're going to be doing a softmod of your Wii (i.e., we're not modifying any hardware), you don't really need much to accomplish this hack.
- Nintendo Wii
- An FAT16-Formatted SD Memory Card (more on this below)
- The Legend of Zelda: Twilight Princess ($50)
- The Wii Brew SD Installer (Windows)
- A Windows PC with an SD card reader
NOTE: I'm doing this all on a Windows PC, but you can manually install the Twilight Hack if you don't have access to a Windows PC.
The secret sauce lies in the Twilight Princess game. Essentially, we're going to load a fake game into Twilight Princess that exploits a buffer overflow and allows you install homebrew software on your Wii.
Sound complicated? Figuring it out may have been, but the excellent Wii hackers have made exploiting the Twilight hack is a cinch.
Hacking Your Wii for Homebrew
 To get started, plug your SD card into your computer. It needs to be formatted as a FAT16 filesystem, so find the SD card in My Computer and format it by right-clicking, selecting Format, and setting FAT as your file system. (If you have trouble formatting your SD card this way, try out the SD Card Formatter.)
Now it's time to prepare the SD card with the Twilight Hack. If you haven't already, download the Wii Brew SD Installer. When you've got it, make sure your SD card is plugged in and run the installer. The installer is fairly self-explanatory, but I'll walk you through it.
Choose Your Install Location

This should match the location of the SD card you just formatted above.
Select the Homebrew Features and Twilight Hack
 Now you need to select the packages you want to install on your SD card (and, eventually, your Wii). I'd suggest selecting the Homebrew Channel (in fact, you need to if you want this to work), the Homebrew Browser, and DVDX (you'll need this last one for DVD playback). Make sure to select the Twilight Hack that matches your region. Hit Next and the Wii SD Installer will copy all the necessary files to your SD card.
 Take Note of Your Twilight Princess Disc

If you're in the U.S., your copy of Twilight Princess is one of three different versions. One of the versions of the disc requires that you use a different save slot when we load the game later on, so just take note of the text on the inner circle of the bottom of the Twilight Princess game disc. (I needed TwilightHack2, for example.)
Perform the Twilight Hack on Your Wii
 By this point, your SD card is officially prepared for your Wii. Unplug it from your computer and move over to your Wii. Plug it in and power up your Wii. At this point, you'll need to erase your current Twilight Princess saved game, copy the Twilight hack to your Wii, and execute it in Twilight Princess. (If you haven't played the game and created a save slot, you should do that before proceeding.) The video below from the WiiBrew folks details exactly how to do this.
 NOTE: If the installation froze after you loaded the saved game and talked to the man, chances are you need to use the other saved game.

You'll need to accept a disclaimer and go through a few other screens to finish the installation (just use the 1 button on your Wiimote to accept). When it completes, head back to the Wii menu. The glorious new Wii Homebrew Channel awaits.
Turn Your Wii into a DVD Player

Now that you've got the Homebrew Channel installed, setting up DVD support is a breeze. Fire up your the Homebrew Channel from the main Wii menu and you should see the DVDx installer and Homebrew Browser. Click on the DVDx installer and run through the prompt. Hit A to select Normal install unless you've installed a modchip in your Wii. (If you're following this guide, chances are you don't have a modchip.) You've finished the first step.
Now you need to shut off your Wii and plug the SD card back into your computer, because it's time to install mplayer, the app that will play back DVDs on your Wii. You can download it from the HackMii web site at the bottom of this post. (Mplayer appears to be available in the Homebrew Browser, but it's not the version that supports DVD playback, so make sure you download it manually.)
After you've downloaded it, copy the entire mplayer folder to the apps folder on your SD card. Now just take the SD card back to your Wii, plug it in, and run the Homebrew Channel again. This time you should see mplayer next to your other installed apps, like below.

To play back a DVD, just fire up mplayer, insert a DVD, and select the Play DVD option in the mplayer menu. You'll notice two Play DVD menu items, the second of which reads Play DVD (libdvdnav). The libdvdnav attempts to use the built-in DVD menu, while the other just plays the first title. Unfortunately libdvdnav doesn't really work correctly with the Wiimote yet, but it looks to be on its way.

It takes a few seconds for mplayer to start playing the DVD, but once it does it plays without a hitch (or at least it has in all my experience). Thanks to YouTube, here's what it looks like:
The Wiimote/Gamecube controller playback shortcuts work as follows:
A - Pause
B - OSD
1/X - Toggle on screen menu
RIGHT - Seek 10s forward
LEFT - Seek 10s backward
UP - Seek 60s forward
DOWN - Seek 60s backward
+/R - Seek to the next chapter
-/L - Seek to the previous chapter
HOME/Z - Quit
What Else?
Once you've got your Wii opened up to homebrew apps, you've unlocked all kinds of potential, including emulators for old-school gaming consoles, different media players, and other utilities. If you've already got the Homebrew channel running on your Wii, let's hear what homebrew apps you've been using and loving in the comments. If the very idea of hacking your Wii sends shivers down your spine but you'd still like to squeeze out more functionality, check out how to use your Wii as a media center.Thursday, August 21, 2008
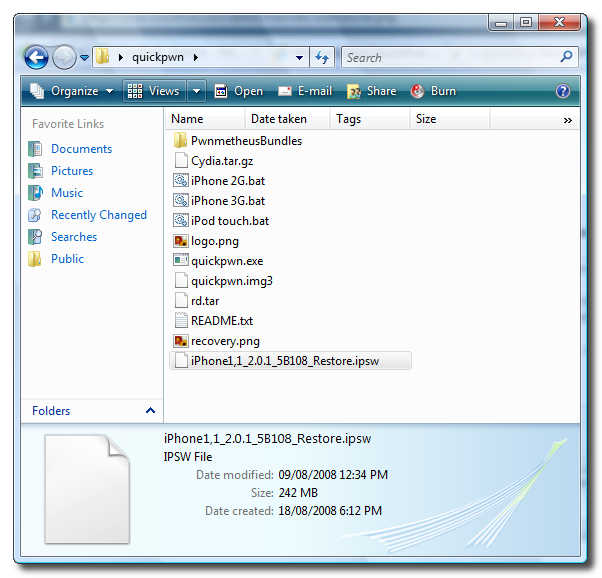
How to Jailbreak Your 2.0.1 iPhone Using QuickPwn (Windows)
These are instructions on how to jailbreak your 2.0.1 iPhone using the QuickPwn command line tool released by the iPhone Dev-Team. Please remember this is beta software and may not work for some.
Currently the recommended solution for jailbreaking your iPhone using windows is still WinPwn.
Step One
Download QuickPwn from here to your desktop.
Step Two
Double click the downloaded zip file(QuickPwn.zip) to extract a folder called quickpwn.

Step Three
Download the 2.0.1 firmware for your specific iPhone and place it in the quickpwn folder you just created.
iPhone 2G: iPhone1,1_2.0.1_5B108_Restore.ipsw
iPhone 3G: iPhone1,2_2.0.1_5B108_Restore.ipsw

Step Four
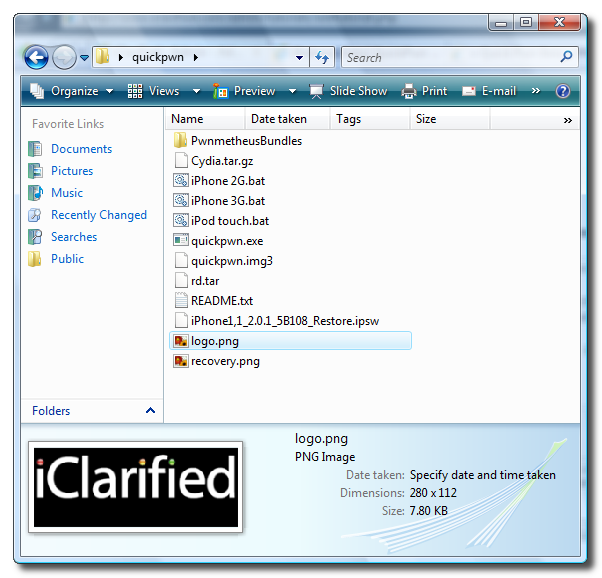
Replace the logo.png and the recovery.png files in the quickpwn directory with your own custom bootloader images. You can download the iClarified boot logo here and the recovery logo here.
If you are creating your own remember the rules are very strict. They must be RGB or Grayscale format with Alpha channel and dimension bellow 320x480.

Step Five
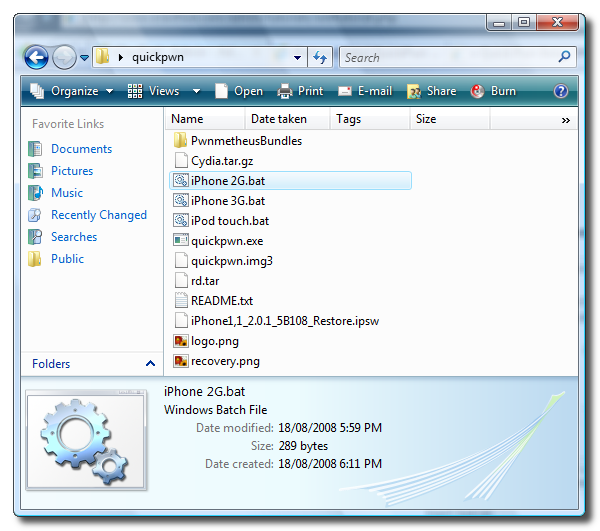
Connect your iPhone to the computer via USB cable, make sure iTunes detects it, and then close any iTunes processes that start. Then in the quickpwn folder double click either iPhone 2G.bat , iPod touch.bat , or iPhone 3g.bat depending on which device you are using.

If prompted click the Run button to launch the batch file.

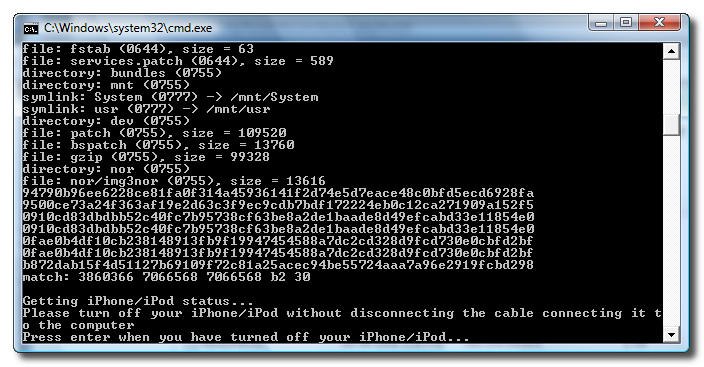
Step Six
You will then be asked to power off your iPhone and press Enter once it has been turned off.

Step Seven
QuickPwn will now help you put your iPhone in DFU Mode. Read through the instructions so you know whats ahead then type in y and press Enter. As an alternative you can put the iPhone into DFU mode yourself using these directions then press Enter.

Step Eight
First you will be asked to hold down the Power button for 5 seconds. Then you will have to also hold down the Home button for 10 seconds without letting go of the Power button. At the end of 10 seconds you will need to release only the Power button.

Step Eleven
After a few seconds of holding down just the Home button QuickPwn will detect the DFU mode and start performing operations.
After 8 operations are performed QuickPwn will ask you to "Please wait while your iPhone is Jailbroken". You can press any key to close the command prompt window.

Your iPhone will display a turning wheel and in a few minutes will be jailbroken! If you have a 2G iPhone and would like to unlock simply install and run BootNeuter from Cydia.
Currently the recommended solution for jailbreaking your iPhone using windows is still WinPwn.
Step One
Download QuickPwn from here to your desktop.
Step Two
Double click the downloaded zip file(QuickPwn.zip) to extract a folder called quickpwn.

Step Three
Download the 2.0.1 firmware for your specific iPhone and place it in the quickpwn folder you just created.
iPhone 2G: iPhone1,1_2.0.1_5B108_Restore.ipsw
iPhone 3G: iPhone1,2_2.0.1_5B108_Restore.ipsw
Step Four
Replace the logo.png and the recovery.png files in the quickpwn directory with your own custom bootloader images. You can download the iClarified boot logo here and the recovery logo here.
If you are creating your own remember the rules are very strict. They must be RGB or Grayscale format with Alpha channel and dimension bellow 320x480.
Step Five
Connect your iPhone to the computer via USB cable, make sure iTunes detects it, and then close any iTunes processes that start. Then in the quickpwn folder double click either iPhone 2G.bat , iPod touch.bat , or iPhone 3g.bat depending on which device you are using.
If prompted click the Run button to launch the batch file.
Step Six
You will then be asked to power off your iPhone and press Enter once it has been turned off.
Step Seven
QuickPwn will now help you put your iPhone in DFU Mode. Read through the instructions so you know whats ahead then type in y and press Enter. As an alternative you can put the iPhone into DFU mode yourself using these directions then press Enter.
Step Eight
First you will be asked to hold down the Power button for 5 seconds. Then you will have to also hold down the Home button for 10 seconds without letting go of the Power button. At the end of 10 seconds you will need to release only the Power button.
Step Eleven
After a few seconds of holding down just the Home button QuickPwn will detect the DFU mode and start performing operations.
After 8 operations are performed QuickPwn will ask you to "Please wait while your iPhone is Jailbroken". You can press any key to close the command prompt window.
Your iPhone will display a turning wheel and in a few minutes will be jailbroken! If you have a 2G iPhone and would like to unlock simply install and run BootNeuter from Cydia.
Wednesday, August 20, 2008
Compilation of Included SV files inside Legacy Verilog Files
Question:
How to enable compilation of included SV files inside legacy Verilog files
and vice versa?
Answer:
The switches "+systemverilogext+.sv:" with :+v2k" or
"+verilog2001ext+.v" with "-sverilog" helps in the compilation of
a mix of SystemVerilog and legacy Verilog files.

+systemverilogext+.sv [+v2k]: compiling all files as legacy Verilog files and
                             files with .sv extension as SV files.

+verilog2001ext+.v [-sverilog]: compiling all files as SystemVerilog files and
                              files with .v extension as legacy Verilog files.

However, these switches will not apply to the included files, as VCS will consider
the included files to be of the same type as the file where they are included,
irrespective of the extension of the included files.

For example:

  //top.v
  `include "intf.sv"
  module top;
  endmodule

  //intf.sv
  interface intf;
  endinterface

With the following command

   % vcs +v2k top.v +systemverilogext+.sv

VCS will issue a syntax error while parsing the included file intf.sv, since VCS
considers the interface file also as a v2k type file as top.v.

The solution to this is as follows.

 Change the file name of top.v to top.sv, so that both top.sv and intf.sv
 will be parsed with SV syntax. However, this might not be feasible if top.v has
 identifiers, which are keywords in SV.

 Hence, a more appropriate solution is to use the switch "-extinclude".
 This would ensure the following switch combination "+systemverilogext+.sv" to be effective
 for the included files as well.

The same switch is applicable in case of "+verilog2001ext+.v" also.

Now with the following command:

  % vcs +v2k top.v +systemverilogext+.sv -extinclude

The above code will be compiled without any errors.

A similar example for the 2nd situation is:

  % vcs -sverilog  +verilog2001ext+.v  TB.sv -extinclude

where in TB.sv, you include a legacy Verilog file dut.v.
16 款 Firefox 上的社会化工具
【扩展】
• Digg
• Faves
• LinkedIn Firefox Companion
• Mahalo Share
• Propeller Friends' Activity Sidebar
• ShareThis
• Yuku
【社会化浏览】
• Me.dium
• ShopTalk
• SiteSays
• Yoono 【工具栏】
• Delicious
• Digg
• Facebook
• Shareaholic
• StumbleUpon
• Digg
• Faves
• LinkedIn Firefox Companion
• Mahalo Share
• Propeller Friends' Activity Sidebar
• ShareThis
• Yuku
【社会化浏览】
• Me.dium
• ShopTalk
• SiteSays
• Yoono 【工具栏】
• Delicious
• Digg
• Shareaholic
• StumbleUpon
35 款面向师生的工具和资源
【分级工具】
• Engrade.com
• GradeNetwork.com
• MyGradeBook.com
• OnlineSchoolReports.com
• SnapGrades.net
【社会化网络】
• Classroom20.com
• Classroomn.com
• HotChalk.com
• TeachAde.com
• TeacherEvents.com
• Teachers.Yahoo.com
【教育与教材】
• AtoZTutoring.com
• Jobs4Tutors.com
• SeriousTeachers.com
• TeachStreet.com
• TutorLinker.com
• TutorNation.com
• Tutorz.com
【在线教程与课件】
• Aim4a.com
• BuddySchool.com
• Educate-Online.com
• GlobalScholar.com
• OnlineLearning.net
• Tutor.com
• TutorVista.com
【其他杂项】
• 4Teachers.org
• Blackboard.com
• TheClassConnection.com
• Digication.com
• Haikuls.com
• KEEP Toolkit
• Moodle.org
35 Tools For Teachers, Tutors and Students【Mashable】
• Studeous.com
• TeacherTube.com
• WiZiQ.com
单位
一=1×10^0
十=1×10^1
百=1×10^2
千=1×10^3
万=1×10^4
亿=1×10^8
兆=1×10^12
京=1×10^16
垓=1×10^20
秭=1×10^24
穰=1×10^28
沟=1×10^32
涧=1×10^36
正=1×10^40
载=1×10^44
极=1×10^48
恒河沙=1×10^52
阿僧祇=1×10^56
那由他=1×10^60
不可思议=1×10^64
无量=1×10^68
大数=1×10^72
十=1×10^1
百=1×10^2
千=1×10^3
万=1×10^4
亿=1×10^8
兆=1×10^12
京=1×10^16
垓=1×10^20
秭=1×10^24
穰=1×10^28
沟=1×10^32
涧=1×10^36
正=1×10^40
载=1×10^44
极=1×10^48
恒河沙=1×10^52
阿僧祇=1×10^56
那由他=1×10^60
不可思议=1×10^64
无量=1×10^68
大数=1×10^72
Friday, August 15, 2008
How to Unlock/Jailbreak Your 2.0.1 2G iPhone (Windows)
This tutorial will use WinPwn to unlock and jailbreak your 2G iPhone on the 2.0.1 firmware. The latest version of WinPwn does install Installer.app
IMPORTANT: Some 2G users have experienced problems with the latest version of WinPwn. *****FOR THE PARTITION SIZER, SET IT TO 512MB!!! IF YOU DO NOT SET IT TO SOMETHING ABOUT 500MBS, IT WILL NOT WORK*****Or either deselect CydiaEither deselect Cydia or you can still follow these instructions using WinPwn 2.0.0.3 and the 2.0.0 iPhone firmware.
Please keep these notes in mind...
- You MUST do a full uninstall of winpwn before installing the new version
- Make sure you have the latest version of iTunes ( Currently 7.7)
- WinPwn uses 300MB of ram at peak due to the ipsw being extracted in memory
- You must first click browse and load an IPSW to use WinPwn (i thought this was clear)
- For 2.0 only the *5A347_Restore.ipsw files are valid. The 345 image will not work
- If you see Failed to load image catalog/payload catalog, this is fine and won't cause problems
- If you already have service with AT&T do not activate or install Youtube Fix
These are instructions on how to unlock and jailbreak your 2.0.1, 2G iPhone using Windows and WinPwn.
To follow this tutorial you will need to have iTunes 7.7 installed (make sure to reboot). Also, you may need to download and install .Net Framework if you are on Windows XP.
Step One
Create a folder on your desktop called Pwnage. In it place the following files: Winpwn 2.0.0.4 or Winpwn 2.0.0.4 , 3.9BL , 4.6BL , and the latest 2.0.1 firmware.

Step Two
Install WinPwn by extracting the downloaded zip from Step One and running the setup executable. Once WinPwn has been installed it will put a shortcut icon on your desktop. Double click to launch the application.
 Step Three
Once WinPwn has opened click the Browse .ipsw button.

Step Four
Locate the 2.0 firmware file (iPhone1,1_2.0.1_5B108_Restore.ipsw) from the Pwnage folder on your desktop and click Open.

Step Five
WinPwn will check the firmware to make sure its valid. Now click the IPSW Builder button.

Step Six
The IPSW Builder window will open to the Applications tab. Check to select Cydia and if you are not on AT&T then check to select YouTube Fix.

Step Seven
Click to select the Custom Images tab. From here you can can select
your own boot images.

Step Eight
Click to select the Custom Payload tab. From this tab you can select custom payloads you have created to be automatically installed. We will discuss this in a future tutorial.

Step Nine
Click to select the Advanced tab. Check to select: Activate Phone, Enable Baseband update, and Unlock baseband.

We will also need to load the Bootloader files. Click the Bootloader 3.9 button and then select the BL39.bin file in your Pwnage Folder. Then click the Bootloader 4.6 button and select the BL46.bin file in your Pwnage Folder.


Step Ten
Click the Build .ipsw button at the bottom left to build your custom ipsw firmware file. Navigate to your Pwnage folder and click the Save button.

Step Eleven
Once WinPwn has finished creating your custom firmware then click the iPwner button from the main menu.


Step Twelve
Select the custom firmware file we just built from the Pwnage folder on your desktop and click the Open button.

Step Thirteen
You will then be notified that your iTunes has been Pwned!

IMPORTANT: Some 2G users have experienced problems with the latest version of WinPwn. *****FOR THE PARTITION SIZER, SET IT TO 512MB!!! IF YOU DO NOT SET IT TO SOMETHING ABOUT 500MBS, IT WILL NOT WORK*****Or either deselect CydiaEither deselect Cydia or you can still follow these instructions using WinPwn 2.0.0.3 and the 2.0.0 iPhone firmware.
Please keep these notes in mind...
- You MUST do a full uninstall of winpwn before installing the new version
- Make sure you have the latest version of iTunes ( Currently 7.7)
- WinPwn uses 300MB of ram at peak due to the ipsw being extracted in memory
- You must first click browse and load an IPSW to use WinPwn (i thought this was clear)
- For 2.0 only the *5A347_Restore.ipsw files are valid. The 345 image will not work
- If you see Failed to load image catalog/payload catalog, this is fine and won't cause problems
- If you already have service with AT&T do not activate or install Youtube Fix
These are instructions on how to unlock and jailbreak your 2.0.1, 2G iPhone using Windows and WinPwn.
To follow this tutorial you will need to have iTunes 7.7 installed (make sure to reboot). Also, you may need to download and install .Net Framework if you are on Windows XP.
Step One
Create a folder on your desktop called Pwnage. In it place the following files: Winpwn 2.0.0.4 or Winpwn 2.0.0.4 , 3.9BL , 4.6BL , and the latest 2.0.1 firmware.
Step Two
Install WinPwn by extracting the downloaded zip from Step One and running the setup executable. Once WinPwn has been installed it will put a shortcut icon on your desktop. Double click to launch the application.
Step ThreeOnce WinPwn has opened click the Browse .ipsw button.
Step Four
Locate the 2.0 firmware file (iPhone1,1_2.0.1_5B108_Restore.ipsw) from the Pwnage folder on your desktop and click Open.
Step Five
WinPwn will check the firmware to make sure its valid. Now click the IPSW Builder button.
Step Six
The IPSW Builder window will open to the Applications tab. Check to select Cydia and if you are not on AT&T then check to select YouTube Fix.
Step Seven
Click to select the Custom Images tab. From here you can can select
your own boot images.
Step Eight
Click to select the Custom Payload tab. From this tab you can select custom payloads you have created to be automatically installed. We will discuss this in a future tutorial.
Step Nine
Click to select the Advanced tab. Check to select: Activate Phone, Enable Baseband update, and Unlock baseband.
We will also need to load the Bootloader files. Click the Bootloader 3.9 button and then select the BL39.bin file in your Pwnage Folder. Then click the Bootloader 4.6 button and select the BL46.bin file in your Pwnage Folder.
Step Ten
Click the Build .ipsw button at the bottom left to build your custom ipsw firmware file. Navigate to your Pwnage folder and click the Save button.
Step Eleven
Once WinPwn has finished creating your custom firmware then click the iPwner button from the main menu.
Step Twelve
Select the custom firmware file we just built from the Pwnage folder on your desktop and click the Open button.
Step Thirteen
You will then be notified that your iTunes has been Pwned!
Step Fourteen
Next we will need to put the iPhone in the DFU mode and restore using iTunes. To put your iPhone into DFU mode please follow these instructions: Press and hold the Home button and the Sleep/Wake button at the same time. After exactly 10 seconds release the Sleep/Wake button. Continue holding the home button until you iTunes pops up a message telling you that it has detected an iPhone in recovery mode. The iPhone screen will remain black. NOTE***: It may take a few attempts to get your iPhone into DFU mode. Generally, I hold down both buttons then release the Home button just before I think the Apple logo would appear. If you are still holding both buttons down and you see the Apple logo you are holding them down for too long!
Step Fifteen
iTunes will prompt you that you are in recovery mode.

Hold down Shift and click the Restore button in iTunes.

A popup window will appear asking you to select your firmware. Select the Custom firmware file we saved in the Pwnage folder and then click the Open button.

Once the restore is complete you will have your iPhone unlocked and jailbroken!
Next we will need to put the iPhone in the DFU mode and restore using iTunes. To put your iPhone into DFU mode please follow these instructions: Press and hold the Home button and the Sleep/Wake button at the same time. After exactly 10 seconds release the Sleep/Wake button. Continue holding the home button until you iTunes pops up a message telling you that it has detected an iPhone in recovery mode. The iPhone screen will remain black. NOTE***: It may take a few attempts to get your iPhone into DFU mode. Generally, I hold down both buttons then release the Home button just before I think the Apple logo would appear. If you are still holding both buttons down and you see the Apple logo you are holding them down for too long!
Step Fifteen
iTunes will prompt you that you are in recovery mode.
Hold down Shift and click the Restore button in iTunes.
A popup window will appear asking you to select your firmware. Select the Custom firmware file we saved in the Pwnage folder and then click the Open button.
Once the restore is complete you will have your iPhone unlocked and jailbroken!
Subscribe to:
Posts (Atom)
