Friday, May 23, 2008

Cisco Command Summary

Cisco Router Configuration Commands

Requirement Cisco Command
Set a console password to cisco Router(config)#line con 0
Router(config-line)#login
Router(config-line)#password cisco
Set a telnet password Router(config)#line vty 0 4
Router(config-line)#login
Router(config-line)#password cisco
Stop console timing out Router(config)#line con 0
Router(config-line)#exec-timeout 0 0
Set the enable password to cisco Router(config)#enable password cisco
Set the enable secret password to peter.

This password overrides the enable password and is encypted within the config file

Router(config)#enable secret peter
Enable an interface Router(config-if)#no shutdown
To disable an interface Router(config-if)#shutdown
Set the clock rate for a router with a DCE cable to 64K Router(config-if)clock rate 64000
Set a logical bandwidth assignment of 64K to the serial interface Router(config-if)bandwidth 64
Note that the zeroes are not missing
To add an IP address to a interface Router(config-if)#ip addr 10.1.1.1 255.255.255.0
To enable RIP on all 172.16.x.y interfaces Router(config)#router rip
Router(config-router)#network 172.16.0.0
Disable RIP Router(config)#no router rip
To enable IRGP with a AS of 200, to all interfaces Router(config)#router igrp 200
Router(config-router)#network 172.16.0.0
Disable IGRP Router(config)#no router igrp 200
Static route the remote network is 172.16.1.0, with a mask of 255.255.255.0, the next hop is 172.16.2.1, at a cost of 5 hops Router(config)#ip route 172.16.1.0 255.255.255.0 172.16.2.1 5
Disable CDP for the whole router Router(config)#no cdp run
Enable CDP for he whole router Router(config)#cdp run
Disable CDP on an interface Router(config-if)#no cdp enable

Cisco Router Show Commands

Requirement Cisco Command
View version information show version
View current configuration (DRAM) show running-config
View startup configuration (NVRAM) show startup-config
Show IOS file and flash space show flash
Shows all logs that the router has in its memory show log
View the interface status of interface e0 show interface e0
Overview all interfaces on the router show ip interfaces brief
View type of serial cable on s0 show controllers 0 (note the space between the 's' and the '0')
Display a summary of connected cdp devices show cdp neighbor
Display detailed information on all devices show cdp entry *
Display current routing protocols show ip protocols
Display IP routing table show ip route
Display access lists, this includes the number of displayed matches show access-lists
Check the router can see the ISDN switch show isdn status
Check a Frame Relay PVC connections show frame-relay pvc
show lmi traffic stats show frame-relay lmi
Display the frame inverse ARP table show frame-relay map

Cisco Router Basic Operations

Requirement Cisco Command
Enable Enter privileged mode
Return to user mode from privileged disable
Exit Router Logout or exit or quit
Recall last command up arrow or
Recall next command down arrow or
Suspend or abort and and 6 then x
Refresh screen output
Compleat Command TAB

Cisco Router Copy Commands

Requirement Cisco Command
Save the current configuration from DRAM to NVRAM copy running-config startup-config
Merge NVRAM configuration to DRAM copy startup-config running-config
Copy DRAM configuration to a TFTP server copy runing-config tftp
Merge TFTP configuration with current router configuration held in DRAM copy tftp runing-config
Backup the IOS onto a TFTP server copy flash tftp
Upgrade the router IOS from a TFTP server copy tftp flash

Cisco Router Debug Commands

Requirement Cisco Command
Enable debug for RIP debug ip rip
Enable summary IGRP debug information debug ip igrp events
Enable detailed IGRP debug information debug ip igrp transactions
Debug IPX RIP debug ipx routing activity
Debug IPX SAP debug IPX SAP
Enable debug for CHAP or PAP debug ppp authentication
Switch all debugging off no debug all

undebug all

CCNA Certification Study Guide

  • Ctrl+Shift+6 then X - Allows you to open more than one telnet session.
  • Only the Hardware addresses change when packets go through routers.
  • Half duplex Ethernet - One station can only send or receive at any time.
  • Ethernet Frame - 64bytes Min 1518bytes Maximum.
  • ISL frames are 1522bytes long, this can be mistaken for Giants and lost. Have to use ISL NIC cards. On router interface use 'encapsulation isl 2' to use ISL frames on VLAN 2.
  • FX and SX are fibre media, 100VG-AnyLAN is twisted pair copper media.
  • Spanning Tree is IEEE 802.1d - created by DEC (Digital Equipment Corp).
  • BPDUs are Multicast frames, sent every 2 seconds. Blocked ports still receive BDPUs.
  • Forward delay - Time taken from listening to learning (approx 50 seconds)
  • Default IEEE bridge priority 32,768, used to select root bridge. If these are identical then switch with lowest MAC address is used.
  • ISDN Protocols - E = Telephone network standards, I = Concepts, Terminology, Q = Switching, Signalling methods.
  • ISDN Reference Points - R = non-ISDN device and TA, S/T = references point between NT1 and NT2, U = NT1 and ISDN network (US only)
  • TE1 = Device compatible with ISDN, TE2 = Device NOT compatible with ISDN, TA = Converts non ISDN signals to ISDN signals, NT1 = Converts 4 wires into 2 wire local loop, NT2 = Providers equipment (Switch, PBX)
  • BRI - 2 * B-channel 64kbps, 1 * D-channel 16kbps (D-channel - LAPD)
  • PRI (Europe, Aus) - 30 * B-channel 64kbps, 1 * D-channel 64kbps (20.48Mbps)
  • PRI (EUS, Japan) - 23 * B-channel 64kbps, 1 * D-channel 64kbps (1.544Mbps)
  • ISDN supports IP, IPX, Appletalk...
  • ISDN can use PPP, HDLC, LAPD, each B-channel needs a SPID
  • Use static routes for ISDN otherwise it will keep link open.
  • MAC address 48 bits (12 Hex), IPX address 80 bits.
  • Netware 3.11 (1983-) - ethernet_802.3/novell-ether (Cisco default on Ethernet networks), Netware 3.12 or later (1985-) - Ethernet_802.2/sap - includes LLC, Ethernet_II - arpa, Ethernet_SNAP - snap, Netware 4.11 - use sap, Netware 5 uses IP
  • Novell RIP - Metrics = ticks and hops (15 max), 60 sec updates (tick = 55ms / 1/18 sec)
  • Novell 4.11 > uses NLSP (Netware Link Service Protocol) Link State Routing
  • SAP - Updates 60 Secs - 4 = Netware file server, 7 = Print server, 24 = Remote bridge server
  • Ping Responses - U = unreachable, C = congestion, I = user interrupt,? = unknown packet type, & = lifetime exceeded
  • Trace Responses - N = Network unreachable, !H = Not forwarded due to ACL restriction, P = Protocol unreachable, U = Port could not be reached
  • Ethernet 5-4-3 rule = Between 2 nodes there can only be max 5 segments, 4 repeaters and only 3 segments must have users.
  • 80/20 rule - 80% of traffic should be local 20% across backbone
  • Class 1 repeater (translational) - delay 140 secs, number you can use 1
  • Class 2 repeater (transparent) - delay 92 secs, number you can use 2
  • CSMA/CD - Used on half duplex devices
  • Auto-negotiate on FastEthernet checks link speed and duplex of line.
  • Protocol field in IP header - TCP = 6, UDP = 17, ICMP = 1, IGRP = 9
  • Ports - 20 FTP data, 21 FTP program, 23 - telnet, 25 - SMTP, 69 - TFTP, 53 - DNS, 80 - HTTP
  • Loopback address - 127.0.0.1
  • ACL - Standard ACL as close to destination as possible, Extended ACL as close to source as possible
  • IP = 1-99, Ex IP = 100-199, AppleTalk = 600-699, IPX = 800-899, Ex IPX = 900-999, IPX SAP = 1000-1099
  • Remember that there is an explicit ACL of 'deny all' if no statements match.
  • Multiprotocol routing supports more than one routing protocol, allows a router to deliver packets from several routed protocols.
  • Core Layer - High speed switching - free from filtering or anything which will slow packets etc.
  • Distribution Layer - Packet manipulation, address area segregation, broadcast domains, VLANs, security (ROUTERS), WAN access, queuing, firewalls, multicast domains, ACLs
  • Access Layer - End users, ACL/filters, remote access, shared bandwidth (SWITCHES), segmentation, DDR
  • HSSI - 52Mbps max
  • ATM cell size - 53bytes
  • Cisco LMI - DLCI - 16-1007, ANSI LMI - DLCI 16-992 (DLCI = 10bits)
  • LMI is a special DLCI = 1023
  • LMI Multicasting reserved for 1019-1022
  • LMI extensions - Virtual circuit status, multicasting, global addressing, simple flow control
  • LMI types Cisco (default), ansi, q933a. From IOS 11.2 LMI is auto-sensed
  • Class A - 1-126
  • Class B - 128.1-191.255
  • Class C 192.0.1-
  • Class D - (1110 highest order bits) - remaining bits for multicasting
  • Class E - (1111 highest order bits) - Reserved for future use
  • RIP 1 (Classful), single subnet, periodic updates of full routing table, max hop count 15
  • RIP 2 (Classless addressing), triggered updates, full routing table updates
  • Directed Broadcast - All host bits set to 1 received by all hosts on local broadcast domain.
  • Local Broadcast (255.255.255.255) - All bits set to 1 received by all hosts on local and remote broadcast domains.
  • Synchronous serial links default to HDLC on Cisco routers
  • VIP cards - type slot/port adapter/interface (e.g e/1/0/2) (remember first interface is 0 not 1)
  • IGRP Metrics - Delay, Bandwidth
  • Default route - ip route 0.0.0.0 0.0.0.0 172.16.20.1 - need to use 'ip classless' (Classless is enabled by default on IOS 12.x) (Only work on stub networks)
  • ip default-network 172.16.1.0
  • CDP timer default 90 secs, holdtime 240 secs
  • Trunked links - FastEthernet or GigabitEthernet only
  • Frame Tagging - ISL = Adds it's own FCS, Cisco propriety (default), IEEE 802.1q
  • LAN Emulation (LANE) - Used for multiple VLANS over ATM
  • 802.10 - FDDI Frame Tagging
  • Hosts can only communicate between VLANS using Layer 3 devices
  • VTP Modes - Server (Default for Catalyst switches) Need at least one server in a VTP domain. All changes are advertised. Client - Sends and receives updates. To make a switch a server make it a client first then promote it once it's VTP database has received the latest revision. Transparent - Does not participate in VTP domain, but forwards VTP ads through trunked links. They keep their own database.
  • VTP adverts sent every 5 mins or when a change occurs, changes only kept by other switches if higher rev no than their current version.
  • VTP pruning - If a switch does not have any ports configured for VLAN 5 then it won't receive updates for it. Disabled by default. Enabled across entire domain if configured. VLAN 1 is not pruning eligible.
  • Config Reg - 00 Rom Monitor, 01 Boot Image from ROM, 02-F NVRAM, Bit 6 set to 1 to ignore NVRAM. Register is 16 Bits.
  • 1900 Switch Config - enable password level 1 - usermode, level 15 - enable password.
  • 1900 switch can have up to 64 VLANS. You cannot telnet from a switch but you can telnet into it.

Thursday, May 22, 2008

Ubuntu与Windows时间冲突的解决

每次切换系统都要找回8小时(进入windows时间会被-8,而ubuntu里正常),,,
裝完後發現的第一個問題是怎麼 CMOS 的系統時間一直被改回 -8 小時,但是進到 ubuntu 又是正常。原來 Linux
作業系統是以主機板 CMOS 時間做為格林威治標準時間,再根據系統設置的時區來確定目前系統時間。但是一般 Windows
系統並不如此,Windows 作業系統直接把 CMOS 時間認定為目前系統時間,不再根據時區轉換。
所以,如果同一電腦裝了兩個系統,進到不同的系統,會發現時間錯亂。可以擇一方法解決: 修改 Windows 去使用時區,或是修改 ubuntu 不使用格林威治標準時間 UTC。
修改 Windows 使用時區方法如下:
HKEY_LOCAL_MACHINE\SYSTEM\CurrentControlSet\Control\TimeZoneInformation\ 中加一項類型為 REG_DWORD 的機碼,名稱為 RealTimeIsUniversal,值設為 1。
修改 ubuntu 不使用格林威治標準時間 UTC (啟用本地時間) 方法如下:
修改 /etc/default/rcS 原來的設定 UTC=yes 為 UTC=no。
原文出处:http://ying.homedns.org/wp/2007/11/277/

Sunday, May 18, 2008

HOWTO: Wireless Security - WPA1, WPA2, LEAP, etc.

This guide was tested with Dapper Drake, Feisty Fawn, Gutsy Gibbon, and Hardy Heron.
--
Since it appears that very few people take wireless security seriously, I'd like to come up with my first HOWTO and explain how I was able to configure a secure home network using WPA2, the latest encryption & authentication standard. There are also other types of configuration (WPA1, mixed mode, LEAP, PEAP, DHCP, etc.) shown in the appendix. Feedback is much appreciated.

Common stumbling blocks - Make sure that:
1. Ethernet cable is unplugged.
2. No firewall & configuration tool is running (e.g. Firestarter).
3. MAC filtering is disabled.
4. NetworkManager, Wifi-Radar & similar wireless configuration tools are disabled/turned off and not in use.
5. Some cards/drivers (e.g. Madwifi) do not support WPA2 (AES). Try WPA1 (TKIP) if WPA2 secured connections fail.
6. RTxxx (Ralink) drivers do not support this approach. Either install "ndiswrapper" replacing Serialmonkey's driver or visit this site.
7. Turn off "roaming" if you repeatedly fail to establish a connection.

My Requirements:
1. WPA2 / RSN
2. AES / CCMP
3. Hidden ESSID (no broadcast)
4. Static IP (because I use port forwarding & firewall, etc.)
5. Pre-shared key (no EAP)

If you want to know more about WPA / RSN & 802.11i security specification, I recommend this site.

Now let's get started:
0. Install "wpa-supplicant":
Quote:
sudo apt-get install wpasupplicant
1. Verify that your network device ("wlan0"?) is working & your wireless network is detected:
Quote:
iwconfig
Quote:
iwlist scan
Your network device & wireless network should appear here.

2. Open "/etc/network/interfaces":
Quote:
sudo gedit /etc/network/interfaces
The content should look similar to this:
Quote:
auto lo
iface lo inet loopback

auto wlan0
iface wlan0 inet dhcp
3. Now replace the last 2 lines with the following using your own network settings (the sequence in which the lines appear is crucial):
Quote:
auto wlan0
iface wlan0 inet static
address 192.168.168.40
gateway 192.168.168.230
dns-nameservers 192.168.168.230
netmask 255.255.255.0

wpa-driver wext
wpa-ssid
wpa-ap-scan 2
wpa-proto RSN
wpa-pairwise CCMP
wpa-group CCMP
wpa-key-mgmt WPA-PSK
wpa-psk [IMPORTANT: See "WPA-PSK key generation"]
  • auto wlan0:
    Your network interface (e.g. wlan0, eth1, rausb0, ra0, etc.).
  • iface wlan0 inet static:
    Self-explanatory... I am using a Static IP instead of DHCP. "iface wlan0" must correspond to your network interface (see above).
  • address, netmask, [..], dns-nameservers:
    Also self-explanatory... Be aware that "broadcast" needs to end with ".255" for negotiation with the router. These lines need to be according to your own (static) network settings. For DHCP see further below.
  • wpa-driver:
    That's the wpa-driver for your card ('wext' is a generic driver that is applicable when using "ndiswrapper"). Leave it as it is. Other drivers are:
    Quote:
    hostap = Host AP driver (Intersil Prism2/2.5/3)
    atmel = ATMEL AT76C5XXx (USB, PCMCIA)
    wext = Linux wireless extensions (generic)
    madwifi = Atheros
    wired = wpa_supplicant wired Ethernet driver
  • wpa-ssid:
    Your network's ESSID (no quotes "").
  • wpa-ap-scan:
    "1" = Broadcast of ESSID.
    "2" = Hidden broadcast of ESSID.
  • wpa-proto:
    "RSN" = WPA(2)
    "WPA" = WPA(1)
  • wpa-pairwise & wpa-group:
    "CCMP" = AES cipher as part of WPA(2) standard.
    "TKIP" = TKIP cipher as part of WPA(1) standard.
  • wpa-key-mgmt:
    "WPA-PSK" = Authentication via pre-shared key (see 'key generation' further below).
    "WPA-EAP" = Authentication via enterprise authentication server.
VERY IMPORTANT:
Now convert your WPA ASCII password using the following command:
Quote:
wpa_passphrase
Resulting in an output like...
Quote:
network={
ssid="test"
#psk="12345678"
psk=fe727aa8b64ac9b3f54c72432da14faed933ea511ecab1 5bbc6c52e7522f709a
}
Copy the "hex_key" (next to "psk=...") and replace in the "interfaces" files with it. Then save the file and restart your network:
Quote:
sudo /etc/init.d/networking restart
You should be connecting to your router now... However, I figured that a restart is sometimes necessary so that's what I usually do (I know this sounds a bit clumsy - see post #2 for startup script).


*****************************Revoking read-permission from 'others'*********************************
Quote:
sudo chmod o=-r /etc/network/interfaces
*****************************Revoking read-permission from 'others'*********************************

*****************************Sample configuration WPA2 & DHCP, ESSID broadcast enabled***************
Quote:
auto wlan0
iface wlan0 inet dhcp
wpa-driver wext
wpa-ssid
wpa-ap-scan 1
wpa-proto RSN
wpa-pairwise CCMP
wpa-group CCMP
wpa-key-mgmt WPA-PSK
wpa-psk [IMPORTANT: See "WPA-PSK key generation"]
*****************************Sample configuration WPA2 & DHCP, ESSID broadcast enabled***************

*****************************Sample configuration WPA1 & DHCP, ESSID broadcast enabled***************
Quote:
auto wlan0
iface wlan0 inet dhcp
wpa-driver wext
wpa-ssid
wpa-ap-scan 1
wpa-proto WPA
wpa-pairwise TKIP
wpa-group TKIP
wpa-key-mgmt WPA-PSK
wpa-psk [IMPORTANT: See "WPA-PSK key generation"]
*****************************Sample configuration WPA1 & DHCP, ESSID broadcast enabled***************

****************************Sample configuration mixed mode (WPA1, WPA2) & DHCP, ESSID broadcast*****
Quote:
auto wlan0
iface wlan0 inet dhcp
wpa-driver wext
wpa-ssid
wpa-ap-scan 1
wpa-proto WPA RSN
wpa-pairwise TKIP CCMP
wpa-group TKIP CCMP
wpa-key-mgmt WPA-PSK
wpa-psk [IMPORTANT: See "WPA-PSK key generation"]
****************************Sample configuration mixed mode (WPA1, WPA2) & DHCP, ESSID broadcast*****

****************************Sample conf. LEAP, WEP, DHCP, ESSID broadcast***************************
Quote:
auto wlan0
iface wlan0 inet dhcp
wpa-driver wext
wpa-ssid
wpa-ap-scan 1
wpa-eap LEAP
wpa-key-mgmt IEEE8021X
wpa-identity
wpa-password
****************************Sample conf. LEAP, WEP, DHCP, ESSID broadcast***************************

****************************Sample conf. PEAP, AES, DHCP, ESSID broadcast***************************
Quote:
auto wlan0
iface wlan0 inet dhcp
wpa-driver wext
wpa-ssid
wpa-ap-scan 1
wpa-proto RSN
wpa-pairwise CCMP
wpa-group CCMP
wpa-eap PEAP
wpa-key-mgmt WPA-EAP
wpa-identity
wpa-password
****************************Sample conf. PEAP, AES, DHCP, ESSID broadcast***************************

*****************************Sample conf. TTLS, WEP, DHCP, ESSID broadcast**************************
Quote:
auto wlan0
iface wlan0 inet dhcp
wpa-driver wext
wpa-ssid
wpa-ap-scan 1
wpa-eap TTLS
wpa-key-mgmt IEEE8021X
wpa-anonymous-identity
wpa-identity
wpa-password
wpa-phase2 auth=PAP [Also: CHAP, MSCHAP, MSCHAPV2]
*****************************Sample conf. TTLS, WEP, DHCP, ESSID broadcast**************************

*****************************NOT TESTED: Sample conf. EAP-FAST, WPA1/WPA2, DHCP, ESSID broadcast****
Quote:
auto wlan0
iface wlan0 inet dhcp
wpa-driver wext
wpa-ssid
wpa-ap-scan 1
wpa-proto RSN WPA
wpa-pairwise CCMP TKIP
wpa-group CCMP TKIP
wpa-key-mgmt WPA-EAP
wpa-eap FAST
wpa-identity
wpa-password
wpa-phase1 fast_provisioning=1
wpa-pac-file /path/to/eap-pac-file
*****************************NOT TESTED: Sample conf. EAP-FAST, WPA1/WPA2, DHCP, ESSID broadcast****

*****************************Tested adapters****************************************** *********
Quote:
1. Linksys WUSB54G V4 (ndiswrapper; wpa-driver = wext)
2. Intel IPW2200 (Linux driver; wpa-driver = wext)
3. Linksys WPC54G (ndiswrapper; wpa-driver = wext)
4. D-Link WNA-2330 (Linux driver; wpa-driver = madwifi)
5. Linksys WMP54G V2 (ndiswrapper; wpa-driver = wext)
6. D-Link WDA-2320 (Linux driver; wpa-driver = madwifi)
7. Netgear WPN311 (Linux driver; wpa-driver = wext)
8. Netgear WG511v2 (ndiswrapper; wpa-driver = wext)
*****************************Tested adapters****************************************** *********

*****************************Post this if you are stumped******************************************
Quote:
# route
# iwconfig
# sudo iwlist scan
# sudo lshw -C network
# sudo cat /etc/network/interfaces
# sudo ifdown -v
# sudo ifup -v
*****************************Post this if you are stumped******************************************

*****************************Other useful commands****************************************** ***
Quote:
# Ubuntu version & kernel >> uname -a
# Root file access >> alt F2 then 'gksudo nautilus' in cli
# Get IP Address or Renew >> sudo dhclient wlan0 [or whatever your wl adapter is]
# Get wireless info >> iwconfig
# Get AP info >> iwlist scan
# Get wireless info >> iwlist (lots of options will list)
# Routes if wlan0 working >> route
# DNS resolving via eth1 >> cat /etc/resolv.conf
# List devices/modules >> lspci, lsusb, lshw, lsmod
# Restart network >> sudo /etc/init.d/networking restart
# Boot messages >> dmesg
# Kill NWM >> sudo killall NetworkManager
# Events from your wl >> iwevent
# Restart all daemons >> sudo /etc/init.d/dbus restart
# Restart network >> sudo /etc/init.d/networking restart

Tuesday, May 13, 2008

Clock Domain Crossing - An Important Problem

Sometimes, when crossing clock domains, synchronizers are just not enough.

Imagine sending data serially over a single line and receiving it on the other side from the output of a common synchronizer as shown bellow.

Assuming one clock cycle is enough to recover from metastability under the given operating conditions, what seems to be the main problem is not the integrity of the signal - i.e. making sure it is not propagating metastability through the rest of the circuit - but rather the correctness of the data.

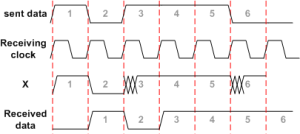
Let’s observe the waveform below. The red vertical lines represent the sampling point of the incoming signal. We see from the waveform that since sometimes we sample during a transition - in effect violating the setup-hold window - the output of the first sampling flop (marked “x“) goes metastable. This metastability does not propagate further into the circuit, it is effectively blocked by the second flop, but since the result of recovery from metastability is not certain (see previous post) the outcome might be a corrupt data.
In this specific example we see that net x goes metastable after sampling the 3rd bit but recovers correctly. In a later sampling, for the 6th bit we see that the recovered outcome is not correct and as a result the output data is wrong.

Another interesting case is when both the send clock and the receive clock are frequency locked but their phase might drift in time or the clock signals might experience occasional jitter.
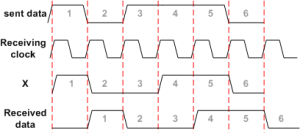
In that case, a bit might “stretch” or “shrink” and can be accidentally sampled twice or not sampled at all.
The waveform below demonstrates the problem. Notice how bit 2, was stretched and sampled twice.

To sum up, never use a simple synchronizer structure to transfer information serially between clock domains, even if they are frequency locked. You might be in more trouble than you initially thought.

On the next post we will discuss how to solve this problem with ring buffers (sometimes mistakenly called FIFOs).

11 款汽油价格比较工具

- FuelMeUp.com
- AltFuelPrices.com
- FuelWatch.wa.gov.au
- GasBuddy.com
- GasNearU.com
- GasPriceWatch.com
- GasTicker.com
- Motor Trend
- MotorMouth.com.au
- MSN Autos
- PetrolPrices.com

Tuesday, May 6, 2008

HOWTO Install btnx for better mouse control in Ubuntu Hardy

When I installed Hardy, I forgot to copy my awesome xorg.conf which held the configuration to enable all 12 buttons of my Logitech MX1000.

Lo and behold, a new method of configuring it has come about, albeit it was around prior to Gutsy.

btnx is the work of Olli Salonen. The program runs as a daemon, catching mouse events and turning them into either key presses or proper mouse events which the system can interpret. This eases the configuration one must do in order to enjoy the full potential of the high-end Logitech mice—a potential which, in my opinion, Windows cannot reach.

The installation process for btnx is pretty easy.

First, I replaced the mouse section of my /etc/X11/xorg.conf with this section. This may not be necessary, but I did it before discovering btnx.

Section "InputDevice"
Identifier "Logitech MX1000"
Driver "evdev"
Option "Name" "Logitech USB RECEIVER"
Option "HWHEELRelativeAxisButtons" "7 6"
EndSection

Next, open a terminal and cd to the location where you keep your sources. I keep mine in ~/Source. This next section prepares the libraries required to build btnx and its support program, btnx-config, as well as subversion if you don’t already have it installed. I prefer to use subversion and checkout tags if they are available. It makes switching to a new version just a svn sw away. Last, it checks out the source for the two programs.

sudo apt-get install subversion libgtk2.0-dev libglade2-dev libdaemon-dev
svn co http://svn.ollisalonen.com/btnx/tags/btnx-0.4.9/
svn co http://svn.ollisalonen.com/btnx-config/tags/btnx-config-0.4.8/

Next, do a simple cm&smi for each program.

cd btnx-0.4.9
./configure && make && sudo make install
cd ../btnx-config-0.4.8
./configure && make && sudo make install

Now that both programs are installed, you must first configure btnx using btnx-config. Start it as root using the command below or go to Applications > System Tools > btnx. Click “Detect Mouse and Buttons”. You’ll probably be able to figure it out from there.

gksu btnx-config

I have the middle thumb button on my MX1000 configured to activate the Rotate Cube plugin of Compiz. I have it configured as Button10 in Compiz and BUTTON_9 in btnx. Remeber: Compiz and many other programs start counting buttons at 1, but btnx starts at 0.

Saturday, May 3, 2008

10 款发送 SMS 短信的在线工具

- Bloove.com
- ClearSMS.com
- GizmoSMS.com
- Group2Call.com
- Jaxtr.com
- OhDontForget.com
- SMSGupShup.com
- Swaggle.mobi
- Yahoo Mobile
- Yellowpipe