Thursday, October 25, 2007

Interfaces in SystemVerilog

Connectivity across different design modules in Verilog is accomplished through port connections for each interface signal in instantiations. For large designs, this is not very productive as it involves redundant instances and signal declarations and is prone to error.

To resolve this issue, SystemVerilog adds a powerful interface construct to encapsulate the communication between blocks i.e. multiple signals are grouped together to form a single port. The signals declared in the interface definition is in a single location so that any changes in the interface can be captured accurately modifying only once instead of multiple modules as in Verilog. All the modules using this interface need only declare a single interface type port rather than multiple signals. An example of SV interface is below

SV:
  1. // AHB Interface Definition
  2. interface ahb_bus (input logic ahb_hclk, ahb_hresetn); // Interface can have ports.
  3. // These external signals (hclk, hresetn can be implicitly connected between modules
  4. wire [31:0] ahb_hdata;
  5. wire [31:0] ahb_addr;
  6. logic ahb_hwrite;
  7. logic [1:0] ahb_htrans;
  8. logic [2:0] ahb_hsize;
  9. logic [2:0] ahb_hburst;
  10. logic ahb_hready;
  11. logic [1:0] ahb_hresp;
  12. endinterface
  13. // Top level Module
  14. module ahb_top (input logic ahb_hclk, ahb_hresetn);
  15. ahb_bus bus (
  16. .ahb_hclk(ahb_hclk),
  17. .ahb_hresetn(ahb_hresetn) ); // instance of interface
  18. arm_core arm_inst (
  19. // ahb_bus ports
  20. .bus (bus),
  21. // other ports
  22. .port1 (port1) // not part of the interface
  23. ... );
  24. ahb_slave ahb_slave0 (
  25. .bus (bus) );
  26. dma_master dma_master_inst (
  27. .bus (bus),
  28. // Other ports
  29. ---
  30. );
  31. on_chip_mem on_chip_mem_inst (
  32. .bus (bus),
  33. // Other ports
  34. --
  35. );
  36. endmodule
  37. // Module Definitions
  38. module arm_core (
  39. ahb_bus bus, // interface port
  40. // other ports
  41. input logic port1
  42. );
  43. // functionality
  44. endmodule
  45. module ahb_slave (
  46. ahb_slave bus
  47. );
  48. logic [1:0] ahb_hsel;
  49. logic [31:0] slave_address;
  50. // functionality
  51. // Referring signals inside interface requires using interface port name
  52. assign bus.ahb_addr = (ahb_hsel == 2'b0) ? slave_address; 'z;
  53. endmodule
  54. module dma_master (
  55. ahb_bus bus;
  56. // Other ports
  57. ---
  58. );
  59. // functionality
  60. endmodule

An interface can also have tasks, functions, parameters, procedural blocks and type declarations to aid in defining the communication protocol. SV interface cannot have a design hierarchy i.e. no modules can be instantiated in the interface. A modport constructs is provided to define the direction for interface port for different modules. Selecting the appropriate modport for each module can be accomplished during either module definition or during module instance as shown in example below.

SV:
  1. interface ahb_bus (input logic ahb_hclk, ahb_hresetn); // Interface can have ports.
  2. wire [31:0] ahb_hdata;
  3. wire [31:0] ahb_addr;
  4. logic ahb_hwrite;
  5. logic [1:0] ahb_htrans;
  6. logic [2:0] ahb_hsize;
  7. logic [2:0] ahb_hburst;
  8. logic ahb_hready;
  9. logic [1:0] ahb_hresp;
  10. modport master ( inout ahb_hdata,
  11. output ahb_haddr,
  12. output ahb_hsize,
  13. input ahb_hready,
  14. ---
  15. );
  16. modport slave ( inout ahb_hdata,
  17. input ahb_haddr,
  18. input ahb_hsize,
  19. output ahb_hready,
  20. ---
  21. );
  22. endinterface
  23. module ahb_top (.. );
  24. ahb_bus bus (...);
  25. dma_master dma_master_inst (bus.master); // Use the master modport view
  26. ahb_slave ahb_slave0 (bus.slave); // Use the slave modport view
  27. endmodule
  28. // Alternatively, modport construct can be used in module definition
  29. module ahb_slave (ahb_bus.master bus);
  30. endmodule

If no modport is associated with a module, by default all net types are inout and all variable types are ref.

A generic interface port defines the port type using the keyword interface instead of using a name of a specific interface type - the advantage is being able to connect the module to different interfaces. Unlike Verilog, no interface port can be left unconnected and SV .name and .* connection rules can be also be used for interface instances.

SV:
  1. module ahb_slave (interface bus); // generic interface port
  2. ahb_slave ahb_slave0 (bus.slave);

SystemVerilog allows tasks and functions to be declared within interface definitions known as interface methods. The task or function has the same syntax as when declared in a module. Using these interface methods, the communication protocol details can be embedded within the interface definition itself.

SV:
  1. interface ahb_bus (input logic ahb_hclk, ahb_hresetn); // Interface can have ports.
  2. wire [31:0] ahb_hdata;
  3. wire [31:0] ahb_addr;
  4. logic ahb_hwrite;
  5. logic [1:0] ahb_htrans;
  6. logic [2:0] ahb_hsize;
  7. logic [2:0] ahb_hburst;
  8. logic ahb_hready;
  9. logic [1:0] ahb_hresp;
  10. // Task defined internal to interface
  11. task slave_read ( input logic [31:0] raddr);
  12. // ...
  13. endtask
  14. endinterface

Interface methods can also be imported if they are not defined within the interface definition itself. If an interface is connected using modport construct, then the import keyword is used to specify the method. Alternative way is to add the task keyword next to the import and also include function arguments - this is required if the task is exported from an external module.

SV:
  1. interface ahb_bus (input logic ahb_hclk, ahb_hresetn); // Interface can have ports.
  2. wire [31:0] ahb_hdata;
  3. wire [31:0] ahb_addr;
  4. logic ahb_hwrite;
  5. logic [1:0] ahb_htrans;
  6. logic [2:0] ahb_hsize;
  7. logic [2:0] ahb_hburst;
  8. logic ahb_hready;
  9. logic [1:0] ahb_hresp;
  10. modport slave ( import slave_read, // simplest way of importing tasks
  11. inout ahb_hdata,
  12. input ahb_haddr,
  13. input ahb_hsize,
  14. output ahb_hready,
  15. ---
  16. );
  17. // Alternative explicit way
  18. modport slave ( import task slave_read (input [31:0] addr), // explicit
  19. inout ahb_hdata,
  20. input ahb_haddr,
  21. input ahb_hsize,
  22. output ahb_hready,
  23. ---
  24. );

Importing a task or a function through a modport gives the module access to that task by prepending the interface port name to the task name as with other variables. The imported function/task must be declared as automatic in order to be synthesizable.

SV also includes a way to export a task defined in one module to be available to other modules through an interface. For example, if a function is defined in module A and is exported in the modport construct within interface definition using the export keyword, then the task is available to module B that uses that modport. However, this is not synthesizable and we cannot export the same function from multiple instances of a module.

It is also possible to define a task or function using extern keyword without associating it with the modport construct.

SV:
  1. interface shb_bus (....)
  2. ---
  3. extern check_parity (input logic [31:0] data); // Not associated with modport
  4. modport ahb_slave (...);
  5. endinterface
  6. module A (...);
  7. task check_parity (input logic [31:0] data);
  8. // --
  9. endtask
  10. endmodule

Interfaces can also contain procedural blocks like always, always_ff, parameters and generate statements similar to modules.


Casting Strings to Enums in SystemVerilog

Every once and awhile, I want to convert a string to an enumeration in SystemVerilog. Casting from strings to enums is not supported in SystemVerilog, but luckily, it is possible to implement a function to do the appropriate conversion using built in methods designed for iterating over the enum values:

///////////
// enum.sv
///////////
class cmd;
// My enumerated type
typedef enum {UNKNOWN, ADD, SUB, MULT} cmd_e;

// Store the string -> enumerated type mappings.
static cmd_e enum_map[string];

// Configure the mapping from string to enum the first
// time this data structure is created.
virtual function void config_enum_map();
cmd_e e;

string str;
e = e.first();
str = e.name();
enum_map[str] = e;

// Note - we’ve already processed the first element above. This loop
// starts at the *second* element.
for (int i = 1; i < e.num(); i++) begin
e = e.next();
str = e.name();
enum_map[str] = e;
end

foreach (enum_map[m]) begin
$display(”enum_map[%5s] = %5s (%1d)”, m, enum_map[m].name(), enum_map[m]);
end

endfunction: config_enum_map

function cmd_e get_enum(string s);
get_enum = enum_map[s];
endfunction

function new();
if (enum_map.num() == 0) begin
config_enum_map();
end
endfunction: new

endclass: cmd

program test;
initial begin
cmd c = new;
cmd::cmd_e ce;

string s = “ADD”;
ce = c.get_enum(s);
$display(”Enum = %s (%1d) for string %s”, ce.name, ce, s);

end

endprogram

In VCS, run the above code using ‘vcsi -sverilog -ntb_opts dtm -R enum.sv’ to see the following output:

Compiler version VCSi Y-2006.06-SP1; Runtime version VCSi Y-2006.06-SP1;  Oct 21 14:43 2007

enum_map[ADD] = ADD (1)
enum_map[MULT] = MULT (3)
enum_map[SUB] = SUB (2)
enum_map[UNKNOWN] = UNKNOWN (0)
Enum = ADD (1) for string ADD
V C S S i m u l a t i o n R e p o r t

Tuesday, October 23, 2007

我家兜兜第三天

我们家兜兜第三天了。看起来变化还是很大的。小眼睛不是那么的肿了。而且我看到了她的眼睫毛,短短的,淡淡的。听说应该以后会颜色变深,变长的,期待中。

都说看自己家的宝宝越看越可爱,我也有同感。但是讲老实话,我并不是很在意她的长相,只希望我家兜兜能健健康康地快快长大。

兜兜饿了吃奶的时候,样子实在是太可能。但是为了保护她妈妈的隐私,没有拍摄。想起来就想笑。

吃饿的她,安静地睡在自己的小床里。刚开始一动不动,我有点心慌,去用手感觉一下她是不是还在呼吸。生怕兜兜出任何问题。可是她的呼吸很弱,我没办法感觉到。没办法,只好用手去碰一下她的头,看到她动一下才能放心。我喜欢一直看着她睡觉的样子。皱眉,伸舌头,动动小手,转转头,每一个动作都给我还来欢乐。我想记下她的很一个动作,不想错过任何一秒。

今天兜兜做了听力测试,安全通过。我一点都不担心这一点。出生第一天,她就对声音有很好的反应了。

今天带她去做抚摸按摩。刚开始的时候,她哭的很利害,不知道是什么原因。同房间的别一个孩子正在第一次游泳,孩子的爸爸给他录象,结果里面都是我家兜兜的哭声。可是当对兜兜进行“妈妈家你”按摩的时候,她确变的很安静了,真的很神奇。

我家兜兜第一天

经过30几个小时的等待,我终于等到了我家兜兜的到来。我第一眼看到她的时候是在产房里的。护士跟我讲了她的体重,我都没有听清楚。准备好了手机,想给她拍第一张照片,但是当时激动的我根本就没有反应过来。

我家兜兜:
出生于2007年10月21号11:05. 体重:3618g.

见到她的第一眼,让我忘记了30几个小时没有休息的疲惫。

想的很多,确写不出来。我只希望她能健康成长,尽快听到我对她讲“兜兜,爸爸爱你,永远爱你。”


我家兜兜第二天

今天是我们家兜兜来到这个世界的第二天了。看着这张熟睡的脸,有一种说不出的感觉。
相比昨天的所变化。脸不再那么红了。眼睛肿的不那么利害了。
听到兜兜饥饿时的哭声,太宏亮了。一张小脸憋的通红。眼泪也从眼里流了出来。很是可怜。但是不能打扰他这难得的机会,让她增加一点肺活量。
兜兜奶吃的不多,给她准备的奶粉她看起来不太喜欢,只吃了一小口。吃饱后的兜兜安静的很。自己动动小手,小脚。还有她那唯一自己可以控制的舌头。两只眼睛尽力睁天,跟着声音的方向看着一切新奇的事物(尽管她现在还没有视觉)。

Tuesday, October 16, 2007

Ubuntu下的游戏推荐

Linux确实不是拿来玩游戏的,但是有些时候休息一会调剂调剂也是无可厚非的.下面给大家推荐几个我经常在Ubuntu下玩得几个有趣小游戏吧!
1.超级马里奥SuperTux

Ubuntu安装方法:

sudo apt-get install supertux


2.类红警游戏Bos Wars

游戏安装:

Deb包下载:
http://www.getdeb.net/release.php?id=1285
是要先安装数据包,再安装程序包的。
这个游戏也是支持多系统的,其他操作系统版本下载:
http://www.boswars.org/download.shtml

3.类CS游戏 actioncube

游戏安装:原文来自[何必呢]

Deb包下载:
http://www.getdeb.net/release.php?id=732
是要先安装数据包,再安装程序包的。

4.类跑跑卡丁车游戏 SuperTuxKart

Ubuntu安装:

sudo apt-get install supertuxkart

5.战地坦克 Battle-Tank

游戏安装:

Deb包下载:
http://www.getdeb.net/release.php?id=1219
是要先安装数据包,再安装程序包的。

6.类泡泡堂游戏 I Have No Tomatoes

Deb包下载:
http://www.getdeb.net/release.php?id=778
是要先安装数据包,再安装程序包的。

Saturday, October 13, 2007

Pre-scaled Counters

It is obvious that as a normal binary counter increases in width its maximum operation frequency drops. The critical path going through the carry chain up to the last half-adder element is purely combinational and increases with size. But what if our target frequency is fixed (as is usually the case) and we need to build a very wide counter? Here come to the rescue a variant of the normal binary counter - the pre-scaled counter.

Pre-scaled counters are based on the observation (or fact) that in the binary counting sequence, the LSB will toggle in the highest frequency (half that of the clock when working with the rising edge only). The next bit in line will toggle in half that frequency, the next with half of the previous and so on.
In general, the n-th bit will toggle with frequency 2^(n+1) lower than the clock (we assume that bit 0 is the LSB here). A short look at the figure below will convince you.

prescale_binary_seq.png

We can use this to our advantage by “partitioning” the counter we wish to build. In essence we make the target clock frequency of operation independent of the counter size! This means that given that our clock frequency enables us to have a single flop toggling plus minimal levels of logic, one could in theory build am extremely wide counter.

If you really insist, the above statement is not 100% correct (for reasons of clock distribution and skew, carry collect logic of a high number of partition stages, etc.) , but for all practical reasons it is true and useful. Just don’t try to build a counter with googolplex bits.

The basic technique for a 2-partition is shown below. We have an LSB counter which operates at clock frequency. Its width is set so it could still operate with the desired clock frequency. Once this counter rolls over an enable signal is generated for the MSB counter to make a single increment. Notice how we also keep the entire MSB counter clock gated since we know it cannot change its state.

The distance between the filtered clock edges (marked as “X”) of the MSB counter is determined by the width of the LSB counter. This should be constrained as a multi-cycle path with period X when doing synthesis.

prescaled_binary_arch.png

The technique could be extended to a higher amount of “partitions” but then we must remember that the enable for each higher order counter is derived from all enable signals of all previous stages.

An interesting variant is trying to generate and up/down counter which is width independent. It is not so complicated and if you have an idea on how to implement it, just comment.

Monday, October 8, 2007

如何保持注意力

养成建立任务清单的习惯能使你的工作更有条理,而掌握一些保持专注的技巧对工作效率来说同样是很重要的。我敢保证,如果你有定力地全神贯注投入工作几个小时,一定会比不断分心的工作一天取得更多的成果。

杜绝干扰:周遭的干扰足以让你在工作中心神不宁。一直开着的即时通讯软件、Email信箱等等都是随时打断你工 作的干扰源,你需要杜绝它们。一般进入专注状态需要15分钟时间,如果每5分钟就要被打断一次,你又如何能够聚精会神?所以,专门划出时间来工作,拔掉你 的网线或者关掉即使通讯软件,告诉别人你正在工作请勿打搅。

安排合适的工作场合:工作环境对你能否专注工作有很大的影响。

明确目标和弄清任务要求:在工作开始前应该清楚目标和要求,如果你连工作需要完成什么、需要达到什么要求都不知道,其后果是可以想像的——常常导致部分工作的返工、引起无规则行事的混乱局面、工作流程无法顺畅执行,这些停断也会使你无法专注。最后,一天的工作却一事无成。

理出头绪:清空你的大脑,脑中堆着一大摞任务只会让你难以全神贯注。在工作开始前,明确目标的同时,也花上几分钟为所有零碎的任务理出头绪分清秩序,否则你只会在工作中浪费时间去处理所有这些任务带来的混乱和冲突了。

指定时限:限时完成任务对于工作专注度的影响有好有坏。一个存在于意识中的时限能使你忘记琐碎的小事从而提升你的工作速度。时限也会令你陷入无法按时完成工作的焦虑而难以专心于手头实际的工作,所以我建议只在这些情况下为自己设定时限:

  1. 任务时间有限。如果你需要在一天内完成一个可能花费几周时间的工作,就该为任务划分成块,分别设定时限,如此才能保证在短时间内完成任务的重要部分。
  2. 当你遇上那些非常容易扩展伸延的任务。如果你的任务很容易延伸扩展出其他的要求并不断产生子任务,时限可以使你更好地控制进度而不至于东奔西走陷入混乱。
  3. 避免拖延和耽搁。当你担心自己的困怠是否会耽误任务进度时,设定一个时限就是为自己安排了一个监工。

清除障碍:工作中遇到棘手的问题,当你思路受阻时必定会心烦意乱难以专注。这时你就需要来场Brain Storming,写下思路能保持你依然集中精神。

隔离自己:除非需要团队合作,那么就在工作时做个隐士,在闹哄哄的工作环境中隔离自己,构筑一个私人空间,必要时给门贴上“工作中,拒绝打扰”的标识,拔掉电话线,直到工作完成再去与人闲聊攀谈。构建这样的工作环境才能使你更好地专注于工作。

健康能够驱动头脑飞转:身体状况决定了专注程度。没人会指望一个醉醺醺的家伙能百分百地投入工作。长期睡眠不 足;过度使用兴奋药物(比如咖啡因);酽饮浓食;摄入过多能量,这些都会影响你集中注意的能力。请戒绝其中某个不良的生活习惯,保持一个月,看看你的体质 是否得到改善,我的个人经验是,只需要改变一丁点儿生活行为,就可以大幅提高专心能力。

景深的实际拍摄照片

先介绍几个概念:

1、焦点(focus)

与光轴平行的光线射入凸透镜时,理想的镜头应该是所有的光线聚集在一点后,再以锥状的扩散开来,这个聚集所有光线的一点,就叫做焦点。

2、弥散圆(circle of confusion)

在焦点前后,光线开始聚集和扩散,点的影象变成模糊的,形成一个扩大的圆,这个圆就叫做弥散圆。

在 现实当中,观赏拍摄的影象是以某种方式(比如投影、放大成照片等等)来观察的,人的肉眼所感受到的影象与放大倍率、投影距离及观看距离有很大的关系,如果 弥散圆的直径小于人眼的鉴别能力,在一定范围内实际影象产生的模糊是不能辨认的。这个不能辨认的弥散圆就称为容许弥散圆(permissible circle of confusion)。

不同的厂家、不同的胶片面积都有不同的容许弥散圆直径的数值定义。一般常用的是:

画幅

24mm x 36mm

6cm x 9cm

4" x 5"

弥散圆直径

0.035mm

0.0817mm

0.146mm

35mm照相镜头的容许弥散圆,大约是底片对角线长度的1/1000~1/1500左右。前提是画面放大为5x7英寸的照片,观察距离为25~30cm。

3、景深(depth of field)

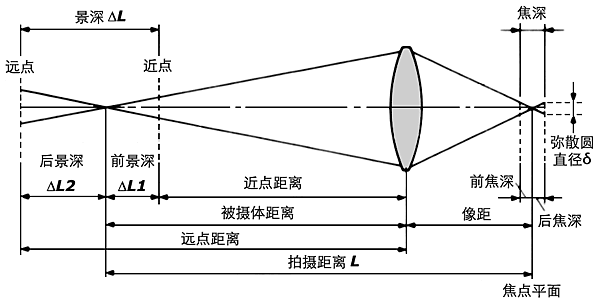
在焦点前后各有一个容许弥散圆,这两个弥散圆之间的距离就叫景深,即:在被摄主体(对焦点)前后,其影像仍然有一段清晰范围的,就是景深。换言之,被摄体的前后纵深,呈现在底片面的影象模糊度,都在容许弥散圆的限定范围内。

景深随镜头的焦距、光圈值、拍摄距离而变化。对于固定焦距和拍摄距离,使用光圈越小,景深越大。

示意图1

示意图2

以持照相机拍摄者为基准,从焦点到近处容许弥散圆的的距离叫前景深,从焦点到远方容许弥散圆的距离叫后景深。

4、景深的计算

下面是景深的计算公式。其中:

δ

——

容许弥散圆直径

f

——

镜头焦距

F

——

镜头的拍摄光圈值

L

——

对焦距离

ΔL1

——

前景深

ΔL2

——

后景深

ΔL

——

景深


FδL2


前景深 ΔL1=

——————

(1)


f2 + FδL


FδL2


后景深 ΔL2=

——————

(2)


f2 - FδL


2f2FδL2

景深 ΔL =

ΔL2 + ΔL2 =

——————


f4 - F2δ2L2

从公式(1)和(2)可以看出,后景深 > 前景深。

由景深计算公式可以看出,景深与镜头使用光圈、镜头焦距、拍摄距离以及对像质的要求(表现为对容许弥散圆的大小)有关。这些主要因素对景深的影响如下(假定其他的条件都不改变):

(1)、镜头光圈:

光圈越大,景深越小;光圈越小,景深越大;

(2)、镜头焦距

镜头焦距越长,景深越小;焦距越短,景深越大;

(3)、拍摄距离

距离越远,景深越大;距离越近,景深越小。

5、一些计算实例

网上有些在线计算器,有兴趣的网友可以参考:

摄影光学计算器

Windows版本的可下载的计数器在

f/Calc

(1)、200/2.8对焦在5m时,f/2.8的景深:

δ

=

0.035mm

f

=

200mm

F

=

2.8

L

=

5000mm

ΔL1

=

60mm

ΔL2

=

62mm

ΔL

=

122mm

结论

:

该镜头在用f/2.8拍摄时,清晰范围是从4.94m~5.062m,景深很浅。

(2)、200/2.8+2X=400/5.6对焦在5m时,f/5.6的景深:

δ

=

0.035mm

f

=

400mm

F

=

5.6

L

=

5000mm

ΔL1

=

30mm

ΔL2

=

31mm

ΔL

=

61mm

结论

:

该镜头在配合2X增距镜后,主镜头用f/2.8拍摄时,景深是(1)的一半。


景深的实际拍摄照片

摄影:什么是景深

景深的控制在摄影技巧中有着举足轻重的地位——它能直接影响照片主题的突出,以及画面的整体效果(层次感)。

  • 什么是景深

使被摄物体产生较为清晰影像的最近点至最远点的距离就是景深。也是被摄物体能清晰成像的空间深度。在景深范围内景物影像的清晰度并不完全一致,其中焦点上的清晰度是最高的,其余的影像清晰度随着它与焦点的距离成正比例下降。

因此可以得出(或者简单来说):景深的深浅取决于焦点的位置。

  • 如何控制景深

调节焦点的位置,景深也就自然而然得到相应的调整。相信大家都知道影响焦点位置的因素:光圈,焦距,摄距(物距)。

这三者与景深的关系如下:

  1. 光圈大,景深小;光圈小,景深大。
  2. 焦距长,景深小;焦距短,景深大。
  3. 物距近,景深小;物距远,景深大。

以上三种关系是控制景深的常用的方法。当然了,在不同的情况下,具体的操作也会有些不同。大家多多尝试就能体会到其中的奥妙了~